
个人项目 Demo
个人 Python 项目从本地 → 推送到 GitHub → 做简单迭代
掌握从 0 到 1 发布项目的基础,这个流程不涉及 CI/CD、高级分支管理之类的企业级流程
准备工作
- 已安装 Git
- 有一个 GitHub账号
- 本地已经能用 Git(git –version 能输出版本)
- 安装了 Python(任意版本)
本地新建一个简单的 Python 项目
创建项目文件夹
mkdir my-python-demo
cd my-python-demo
创建一个 Python 文件(比如 main.py)
echo “print(‘Hello GitHub!’)” > main.py
初始化 Git 仓库
git init
创建 .gitignore 文件
这个文件告诉 Git 哪些文件 不需要被上传(比如虚拟环境、缓存文件)。
echo "__pycache__/\n.env\n*.pyc" > .gitignore
第一次提交
git add .
git commit -m “Initial commit: simple python demo”
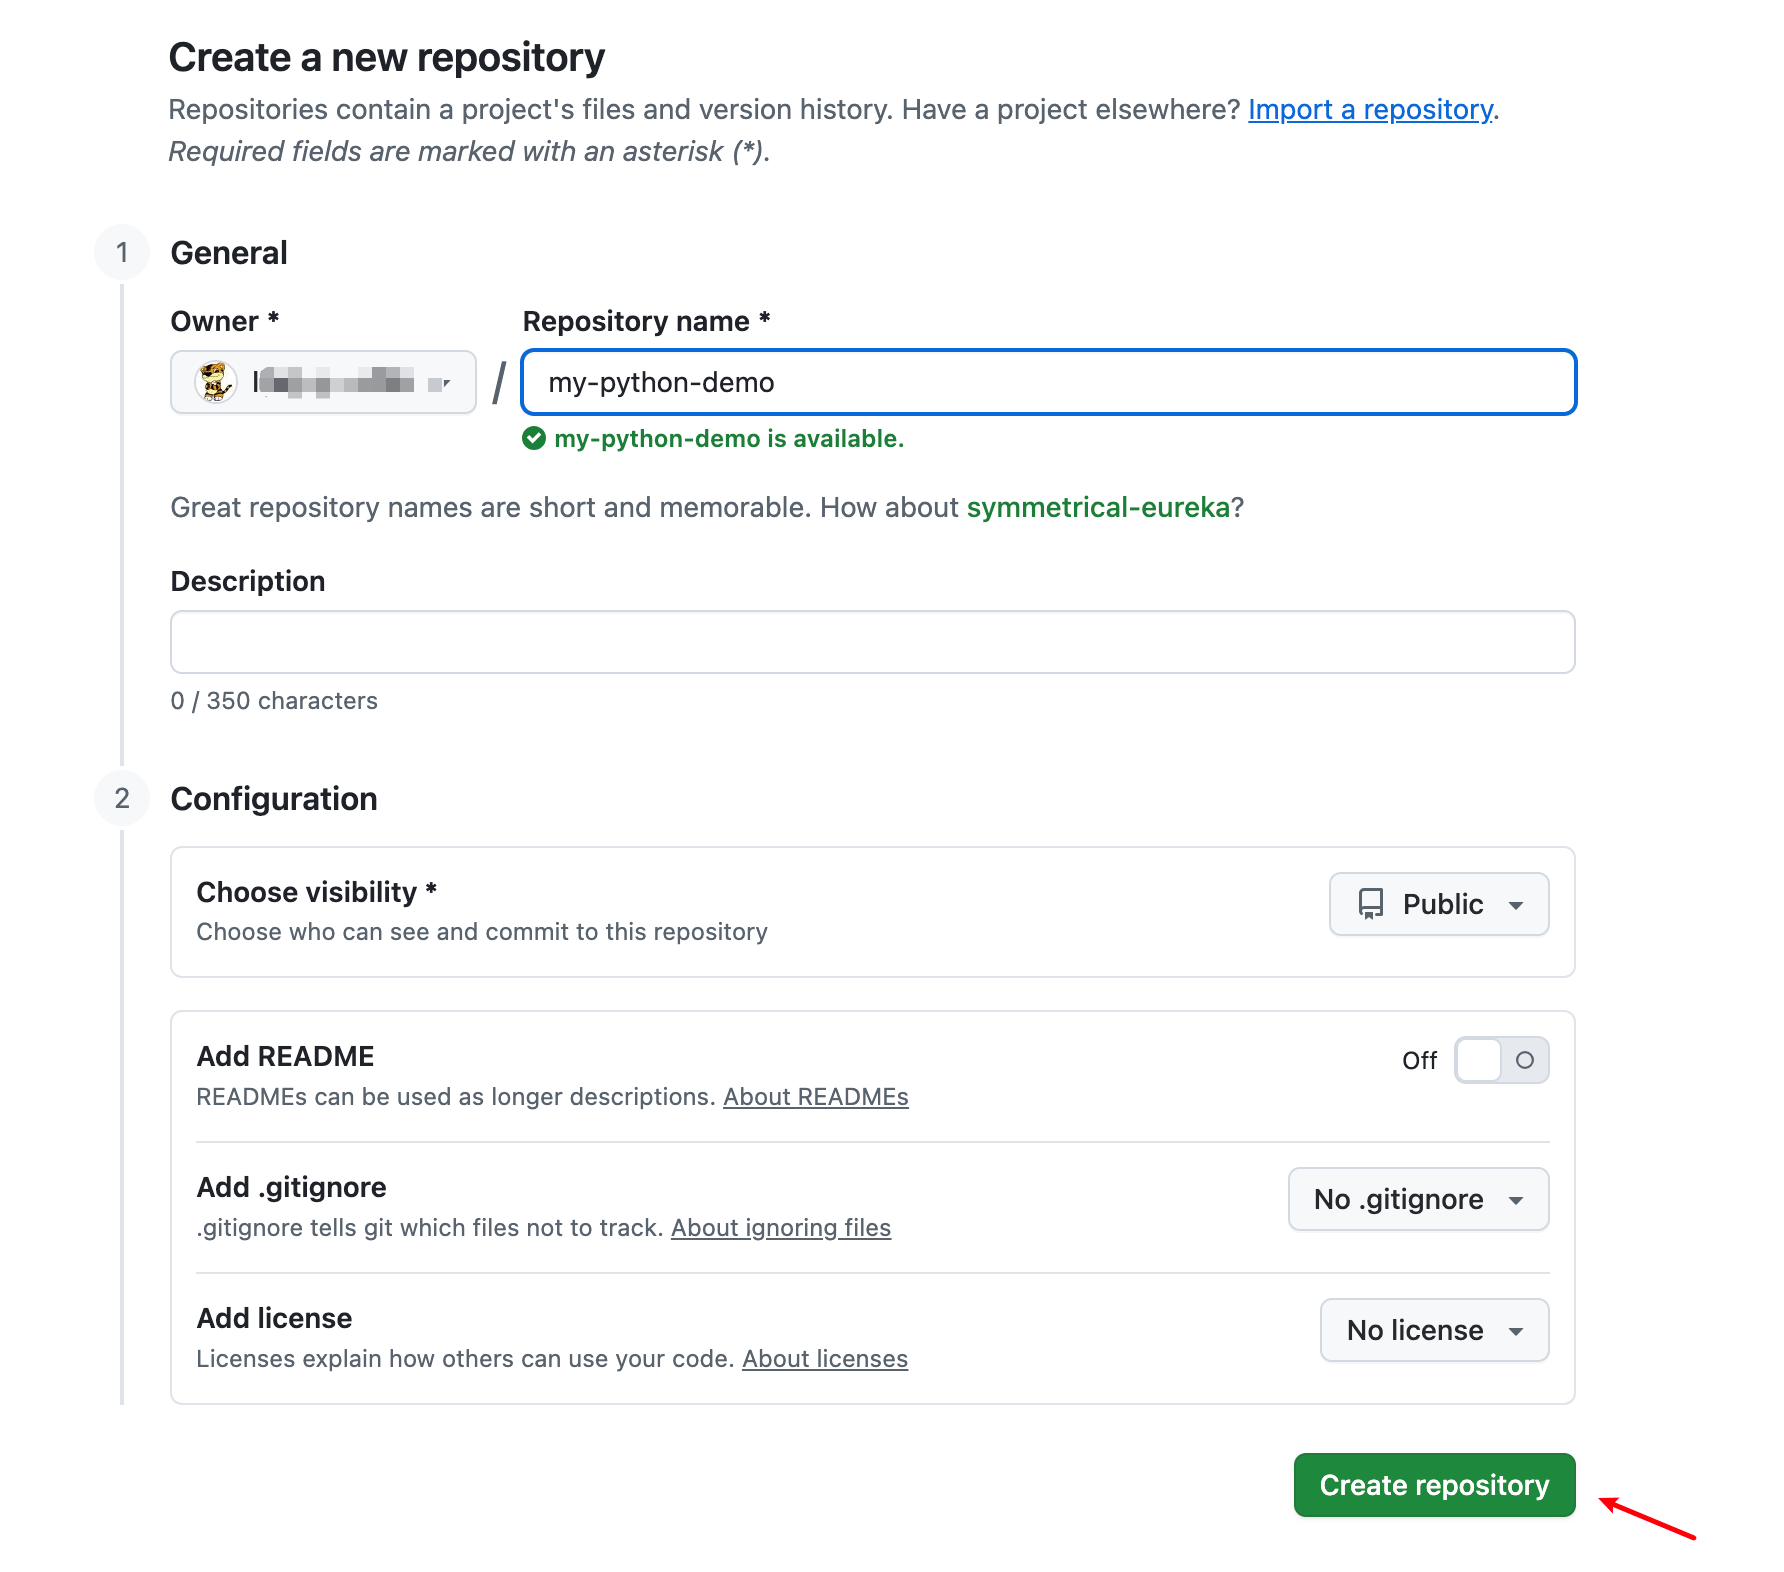
在 GitHub 上新建仓库
打开 GitHub,点击右上角 ➕ → 选择 New repository
填写:
- Repository name:
my-python-demo - 其他选项保持默认(不要勾选 Initialize README、.gitignore 等)
点击「Create repository」

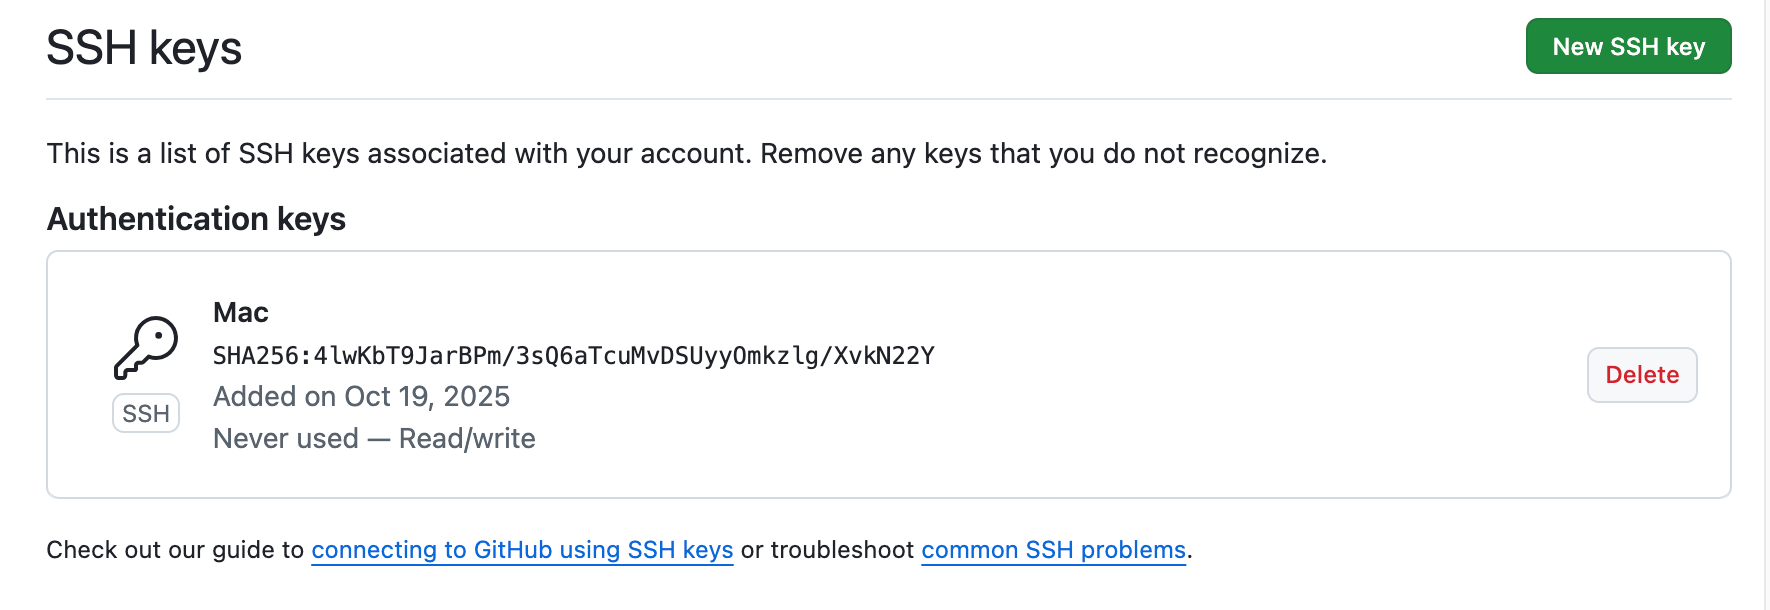
为 github配置SSH Key
生成本地 SSH key
ssh-keygen -t ed25519 -C “your_email@example.com”
把公钥 ~/.ssh/id_ed25519.pub 内容复制到 GitHub → Settings → SSH and GPG keys → New SSH key。
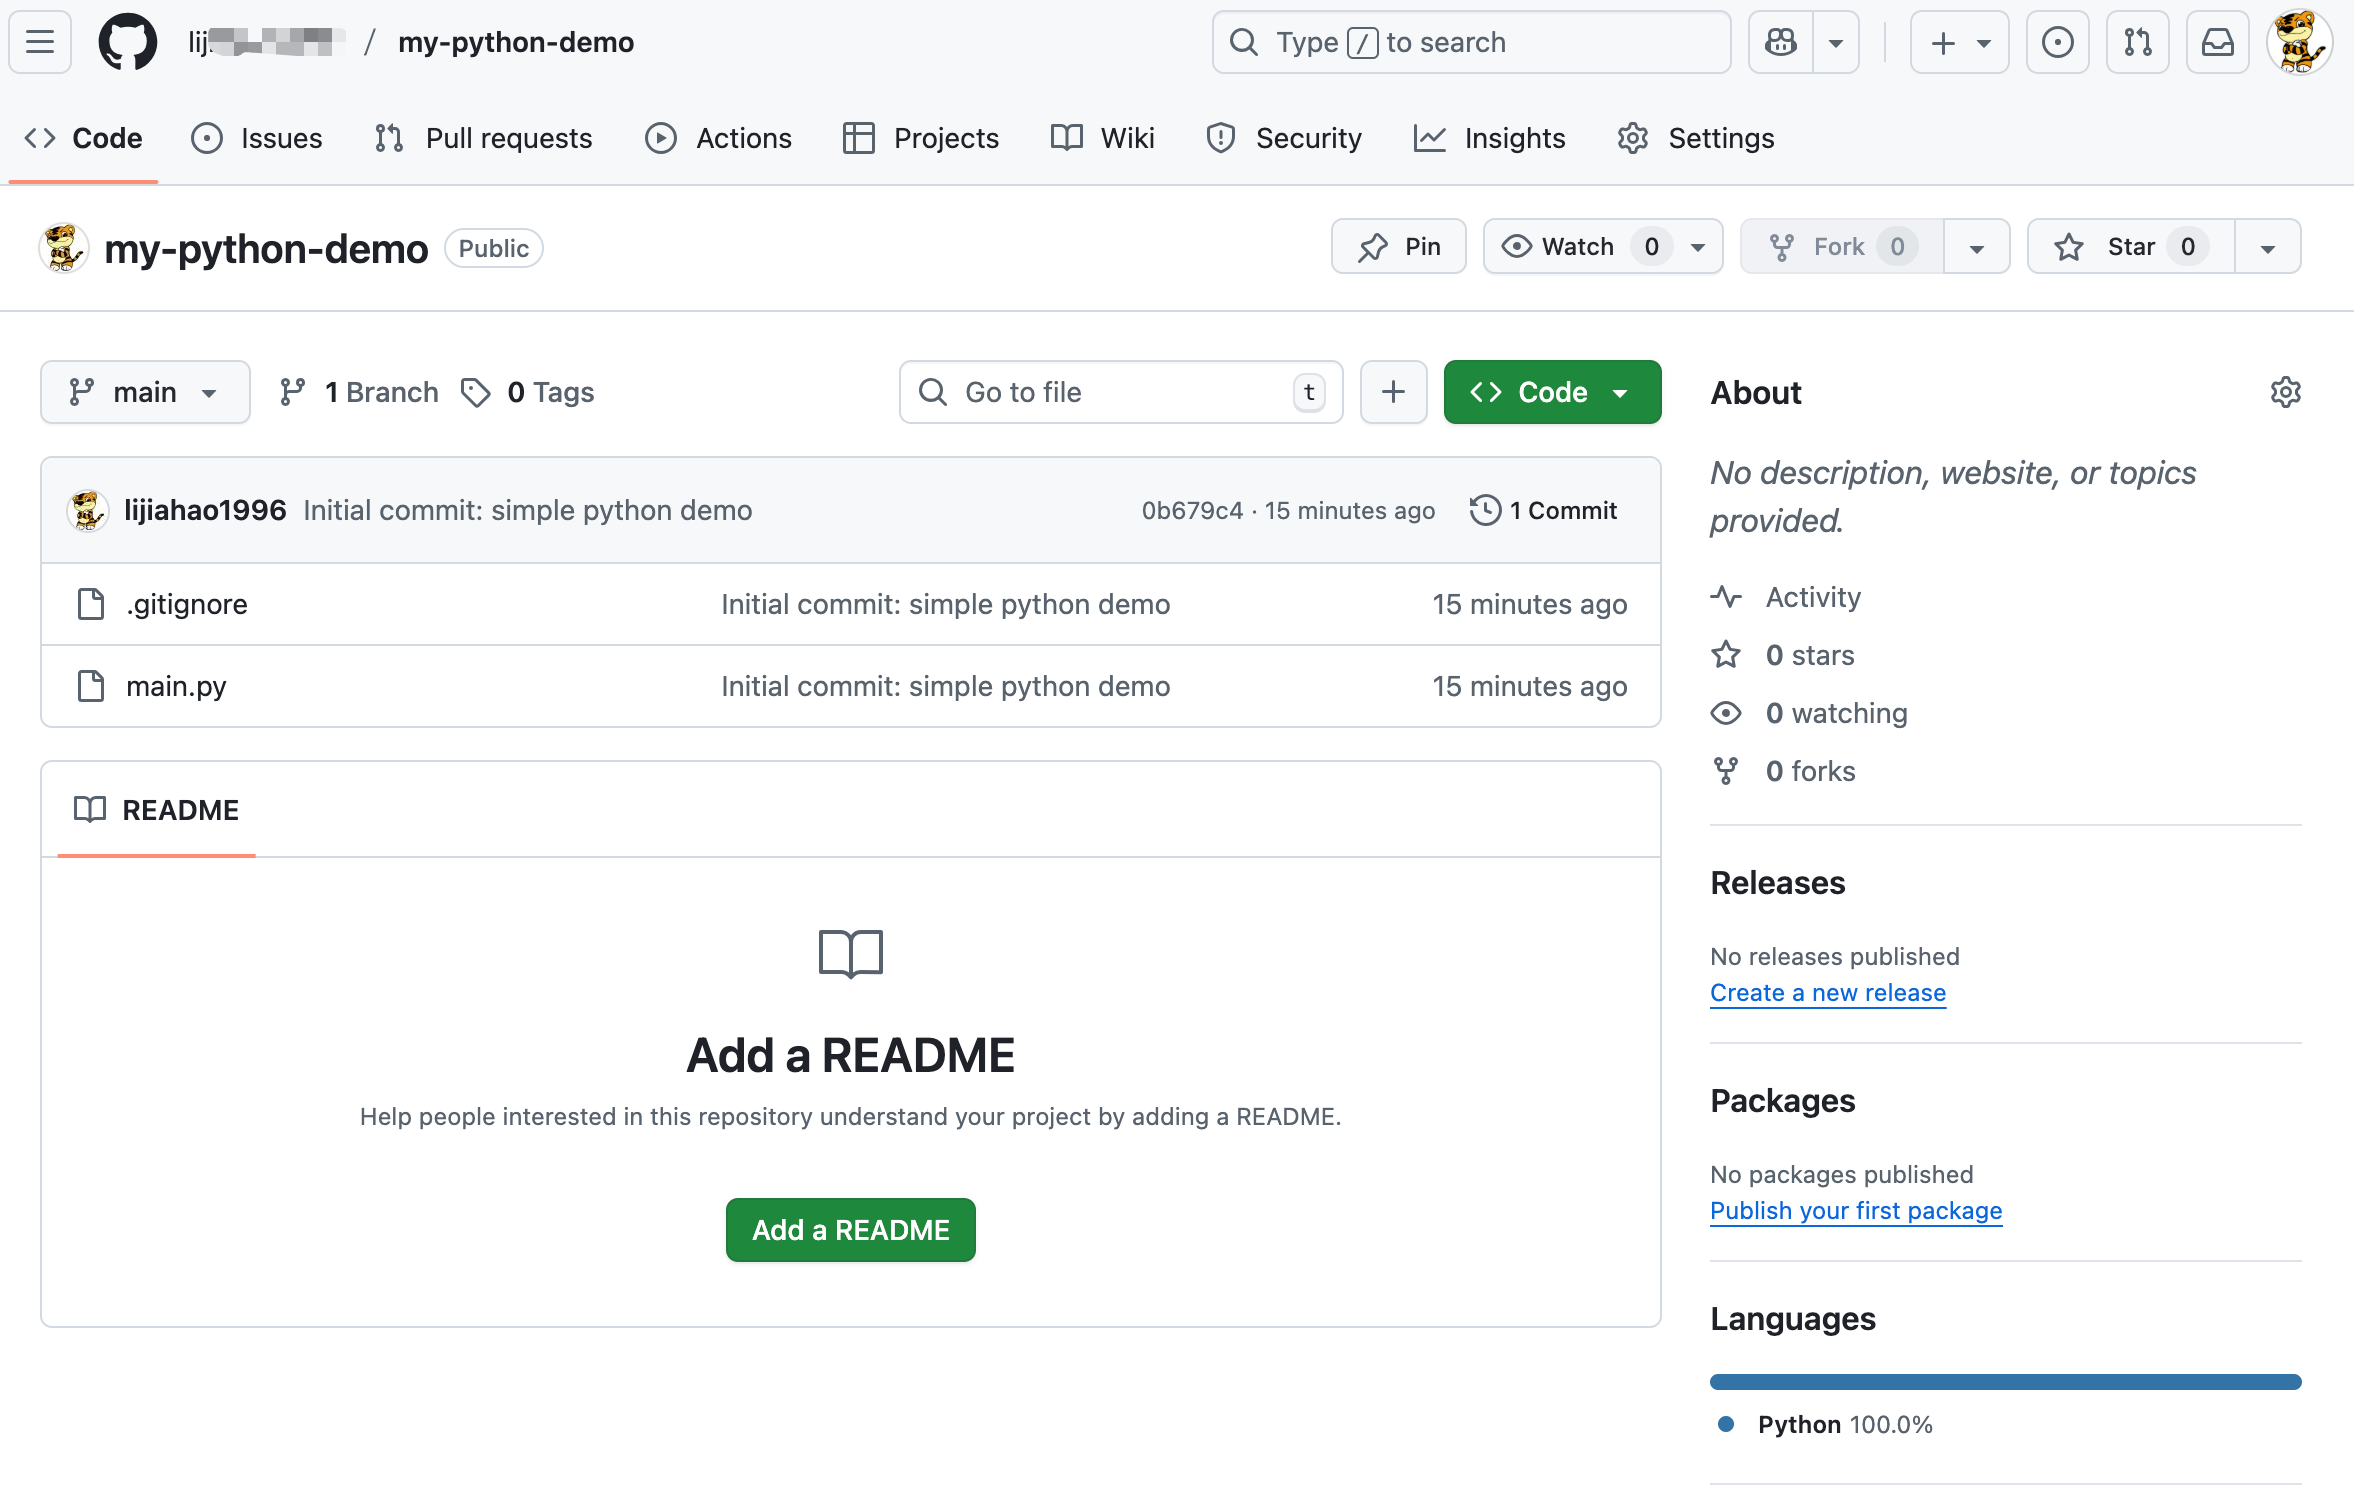
把本地仓库推送到 GitHub(创建项目后会有提示页)
git remote add origin https://github.com/你的用户名/my-python-demo.git
git branch -M main
git push -u origin main
执行完刷新 GitHub 页面,你就会看到代码出现了
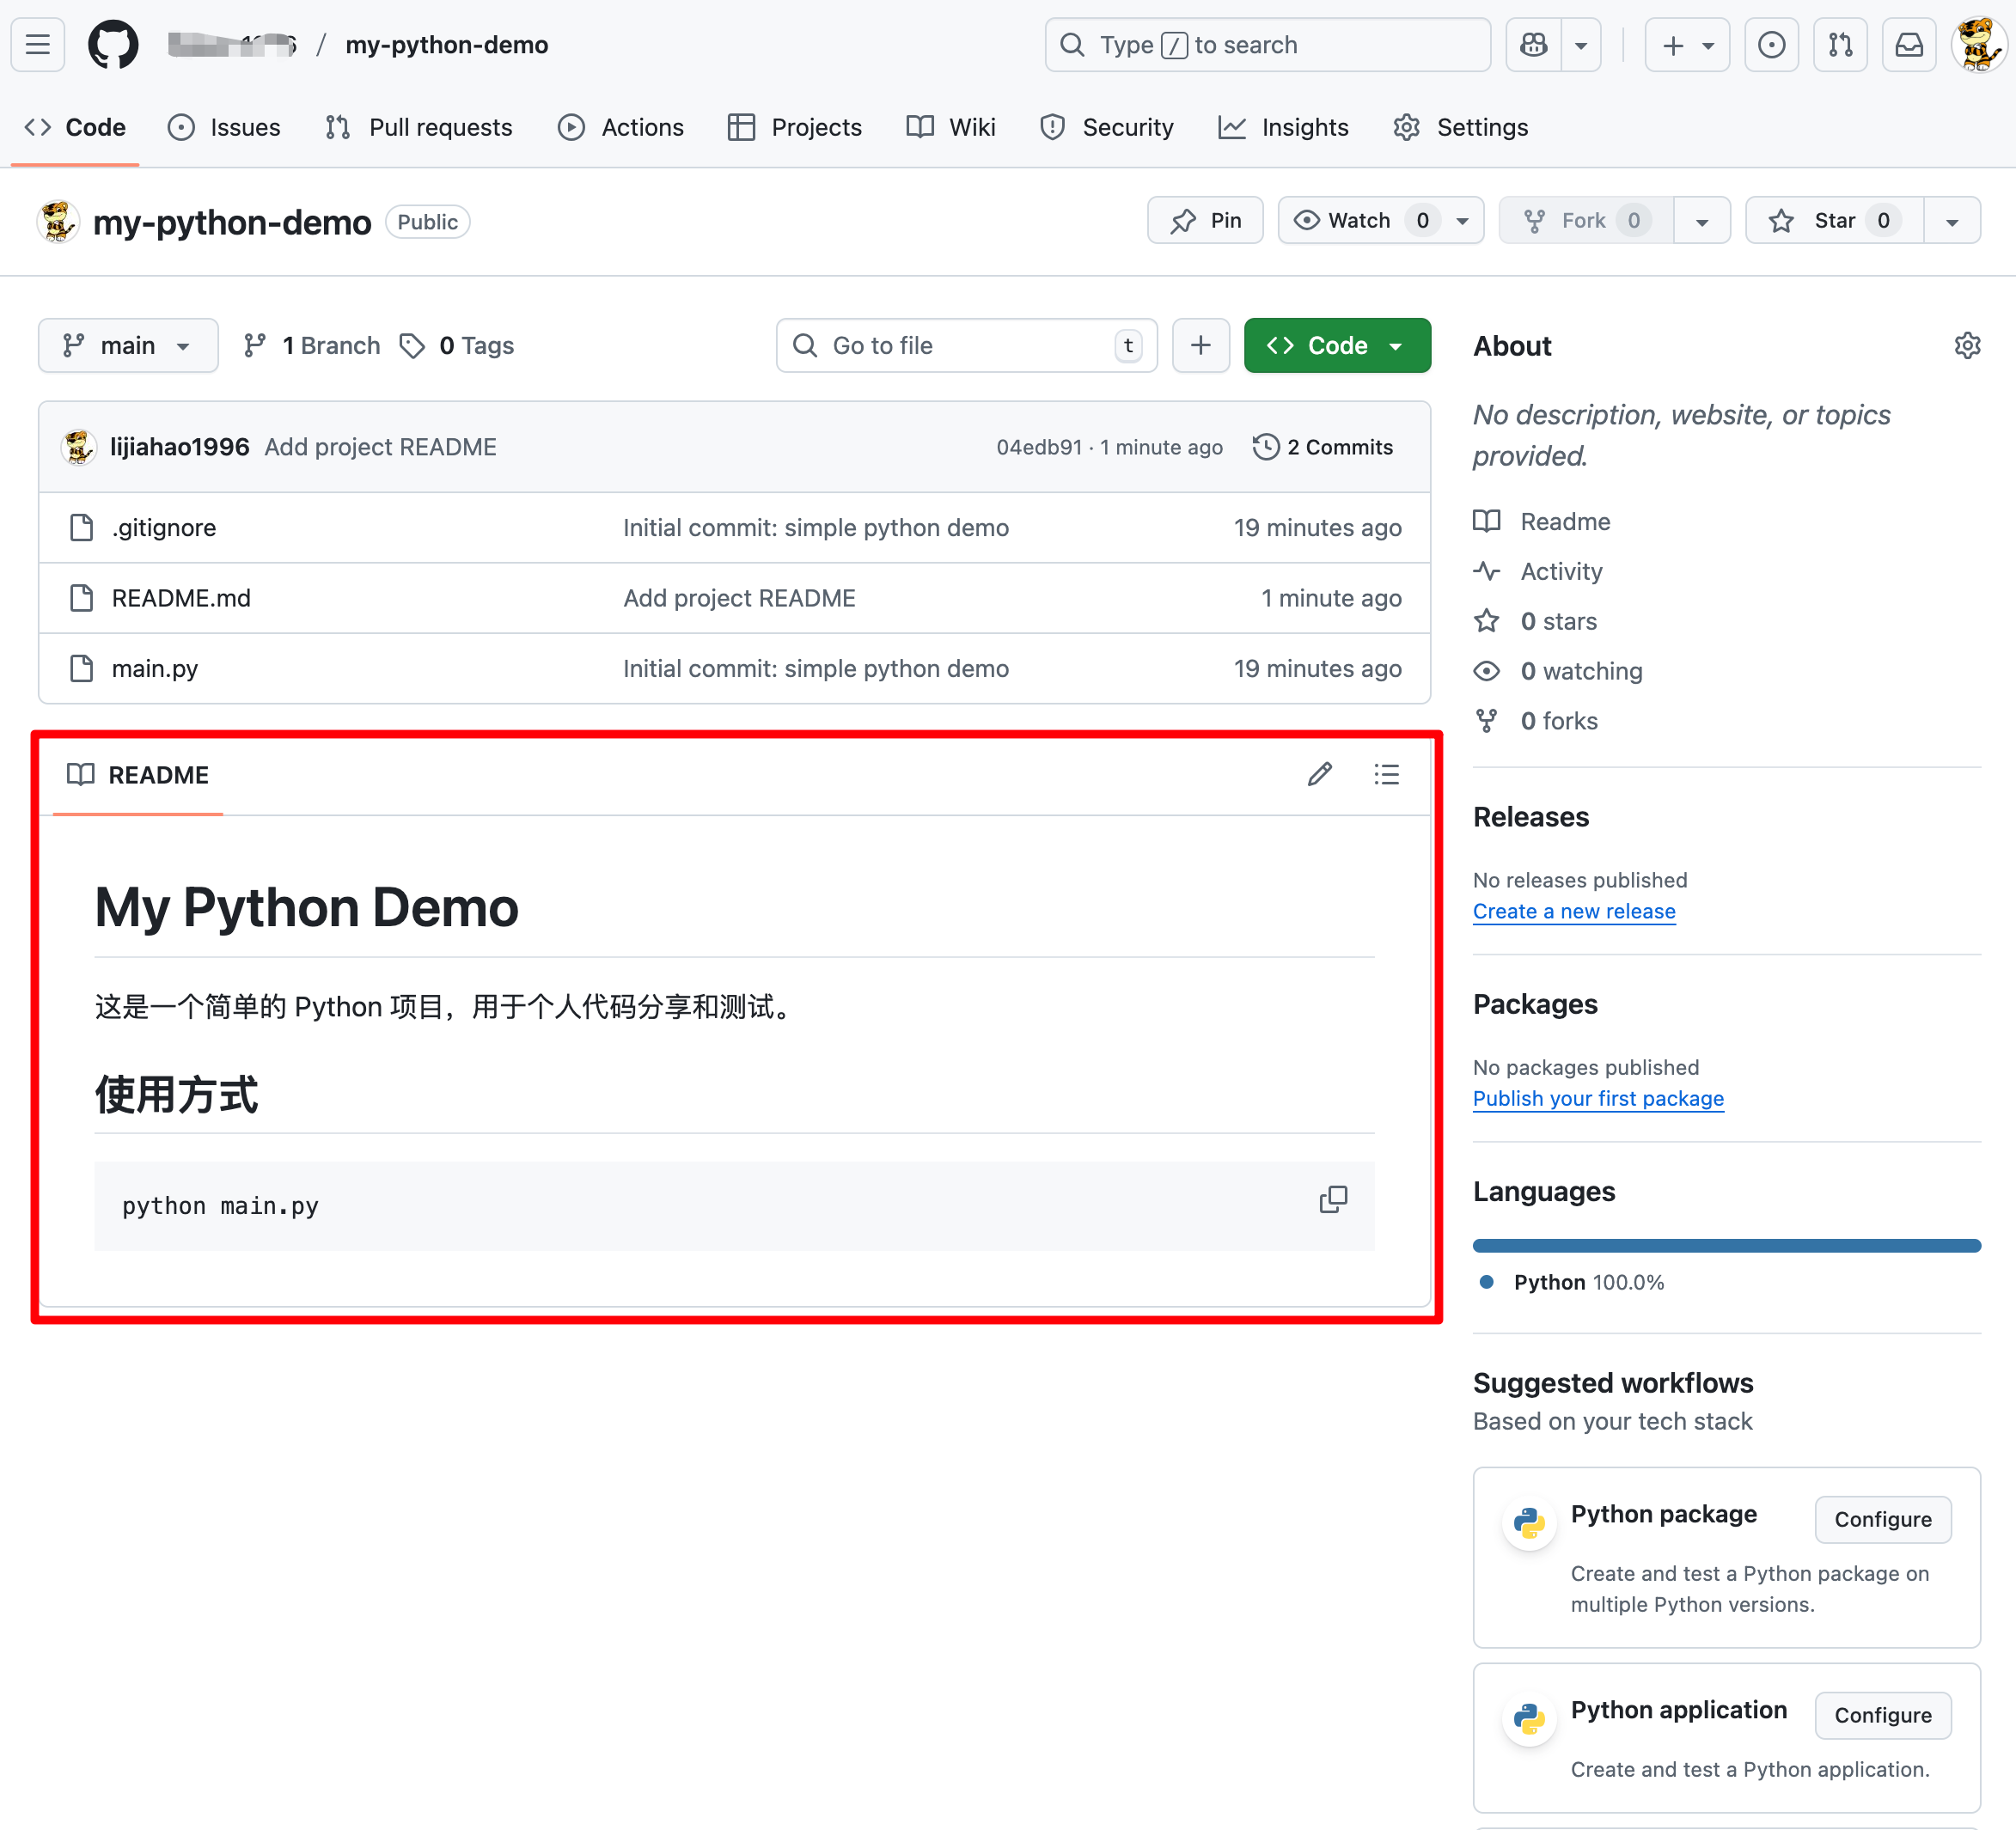
添加 README.md(项目说明)
在根目录创建一个 README.md:
# My Python Demo

这是一个简单的 Python 项目,用于个人代码分享和测试。

## 使用方式
```bash
python main.py
```
提交并推送:
git add README.md
git commit -m "Add project README"
git push
刷新 GitHub,你就能看到项目说明了
创建一个简单的功能分支(模拟迭代)
新建分支并切换
git checkout -b feature-add-function在 main.py 中加一个小功能:
def greet(name):
    print(f"Hello, {name}!")

if __name__ == "__main__":
    greet("GitHub")
提交改动
git add main.py
git commit -m “Add greet() function”
推送分支到 GitHub
git push -u origin feature-add-function
此时到 GitHub 仓库你会看到多了一个分支 feature-add-function
并且页面会提示你「Compare & Pull Request」。
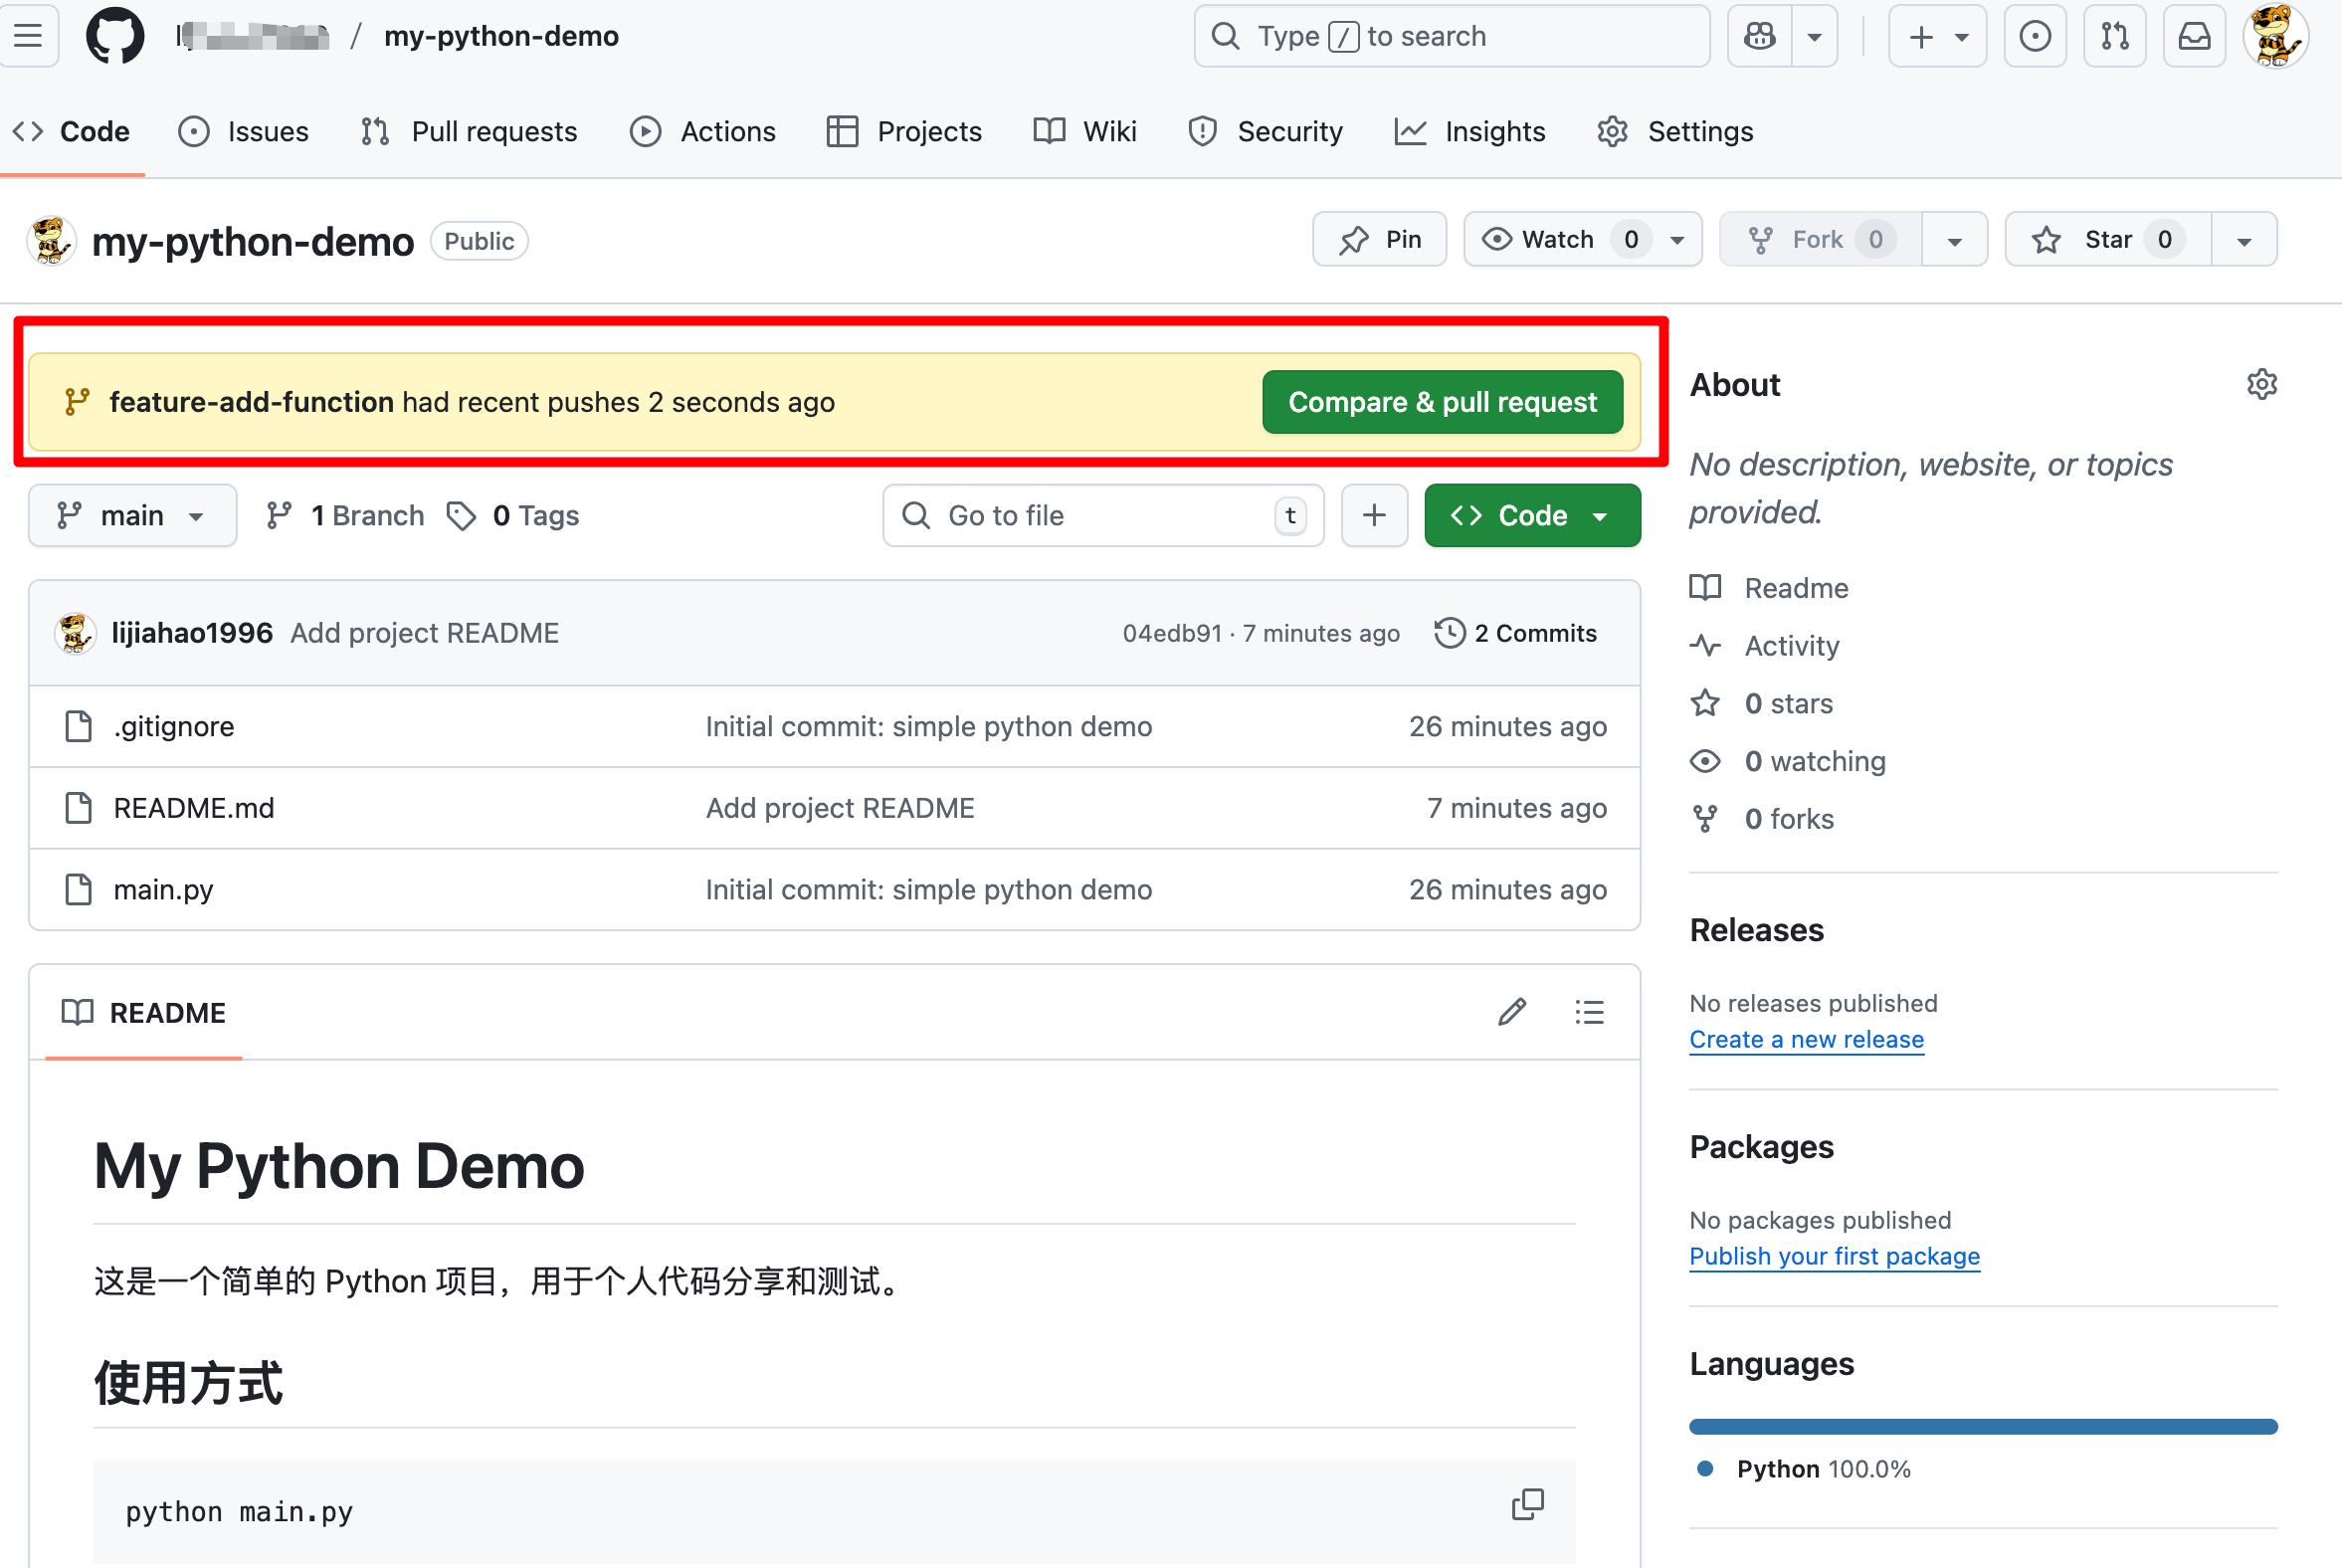
在 GitHub 上合并 Pull Request(PR)
- 点击「Compare & pull request」
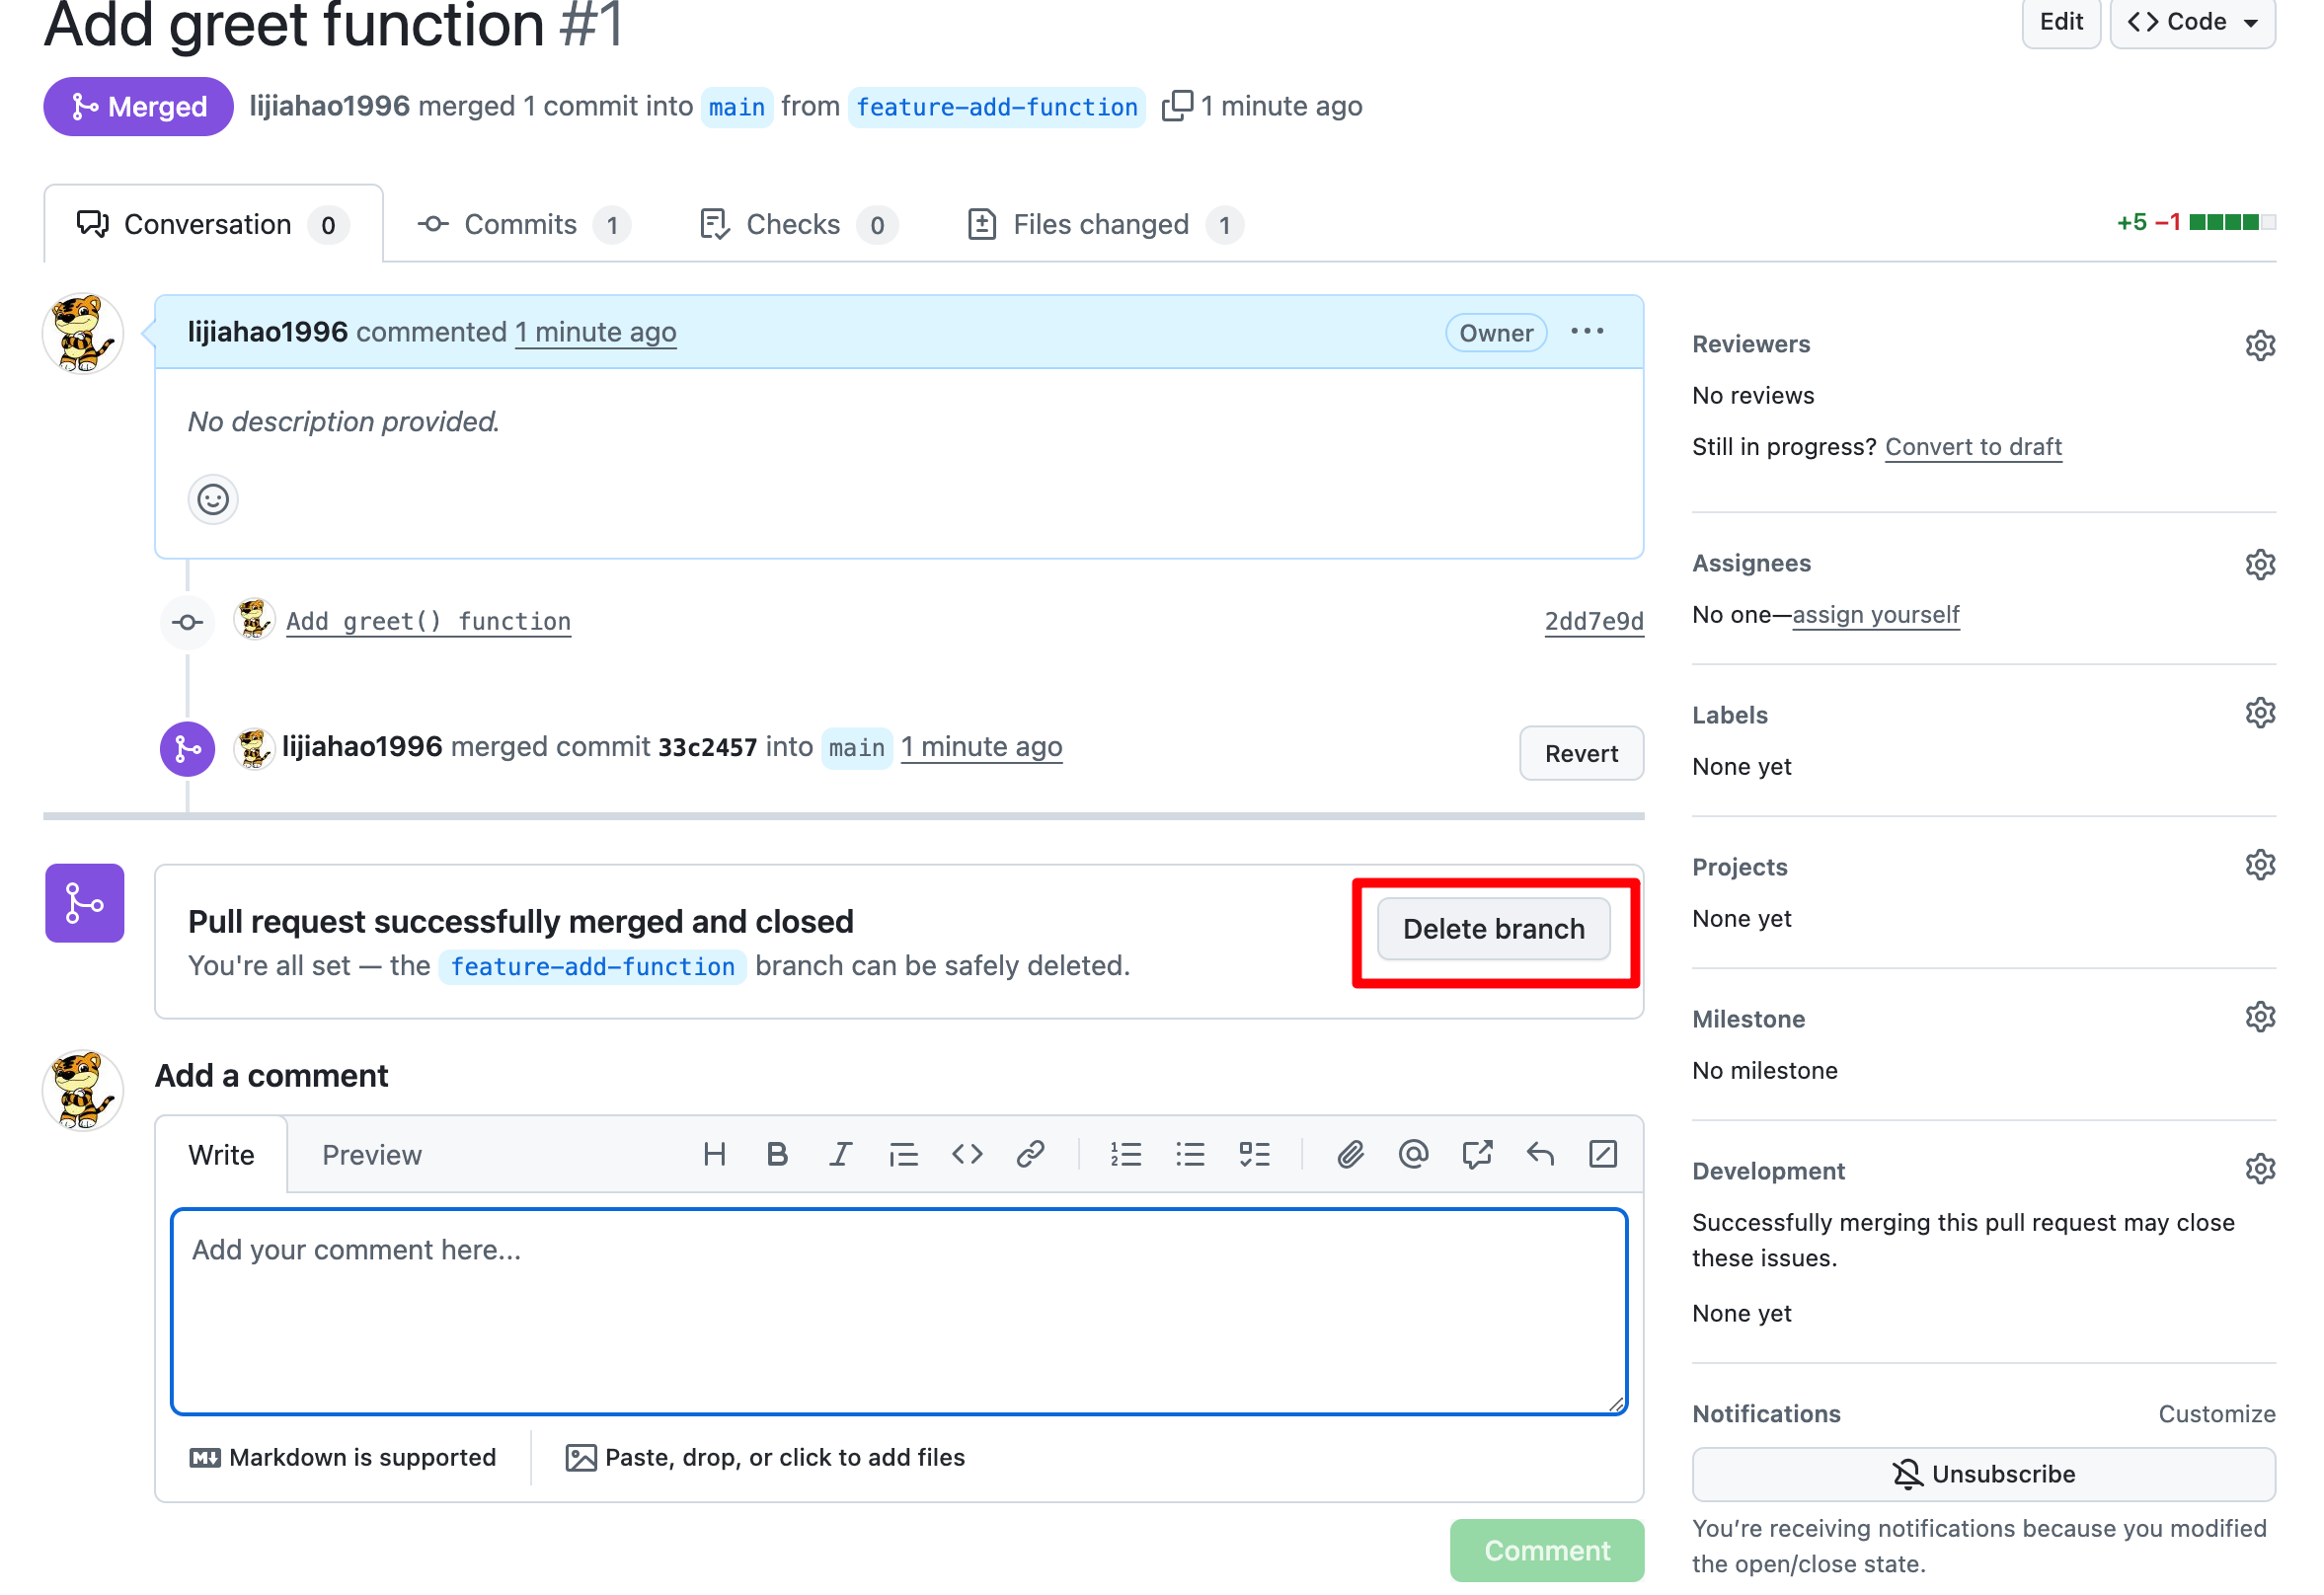
- 填写简单说明(比如“Add greet function”)
- 点击「Create pull request」
- 然后点击「Merge pull request」→「Confirm merge」
- 最后删除这个功能分支(GitHub 会有按钮)
本地同步主分支
合并完 PR 后,在本地执行:
git checkout main
git pull
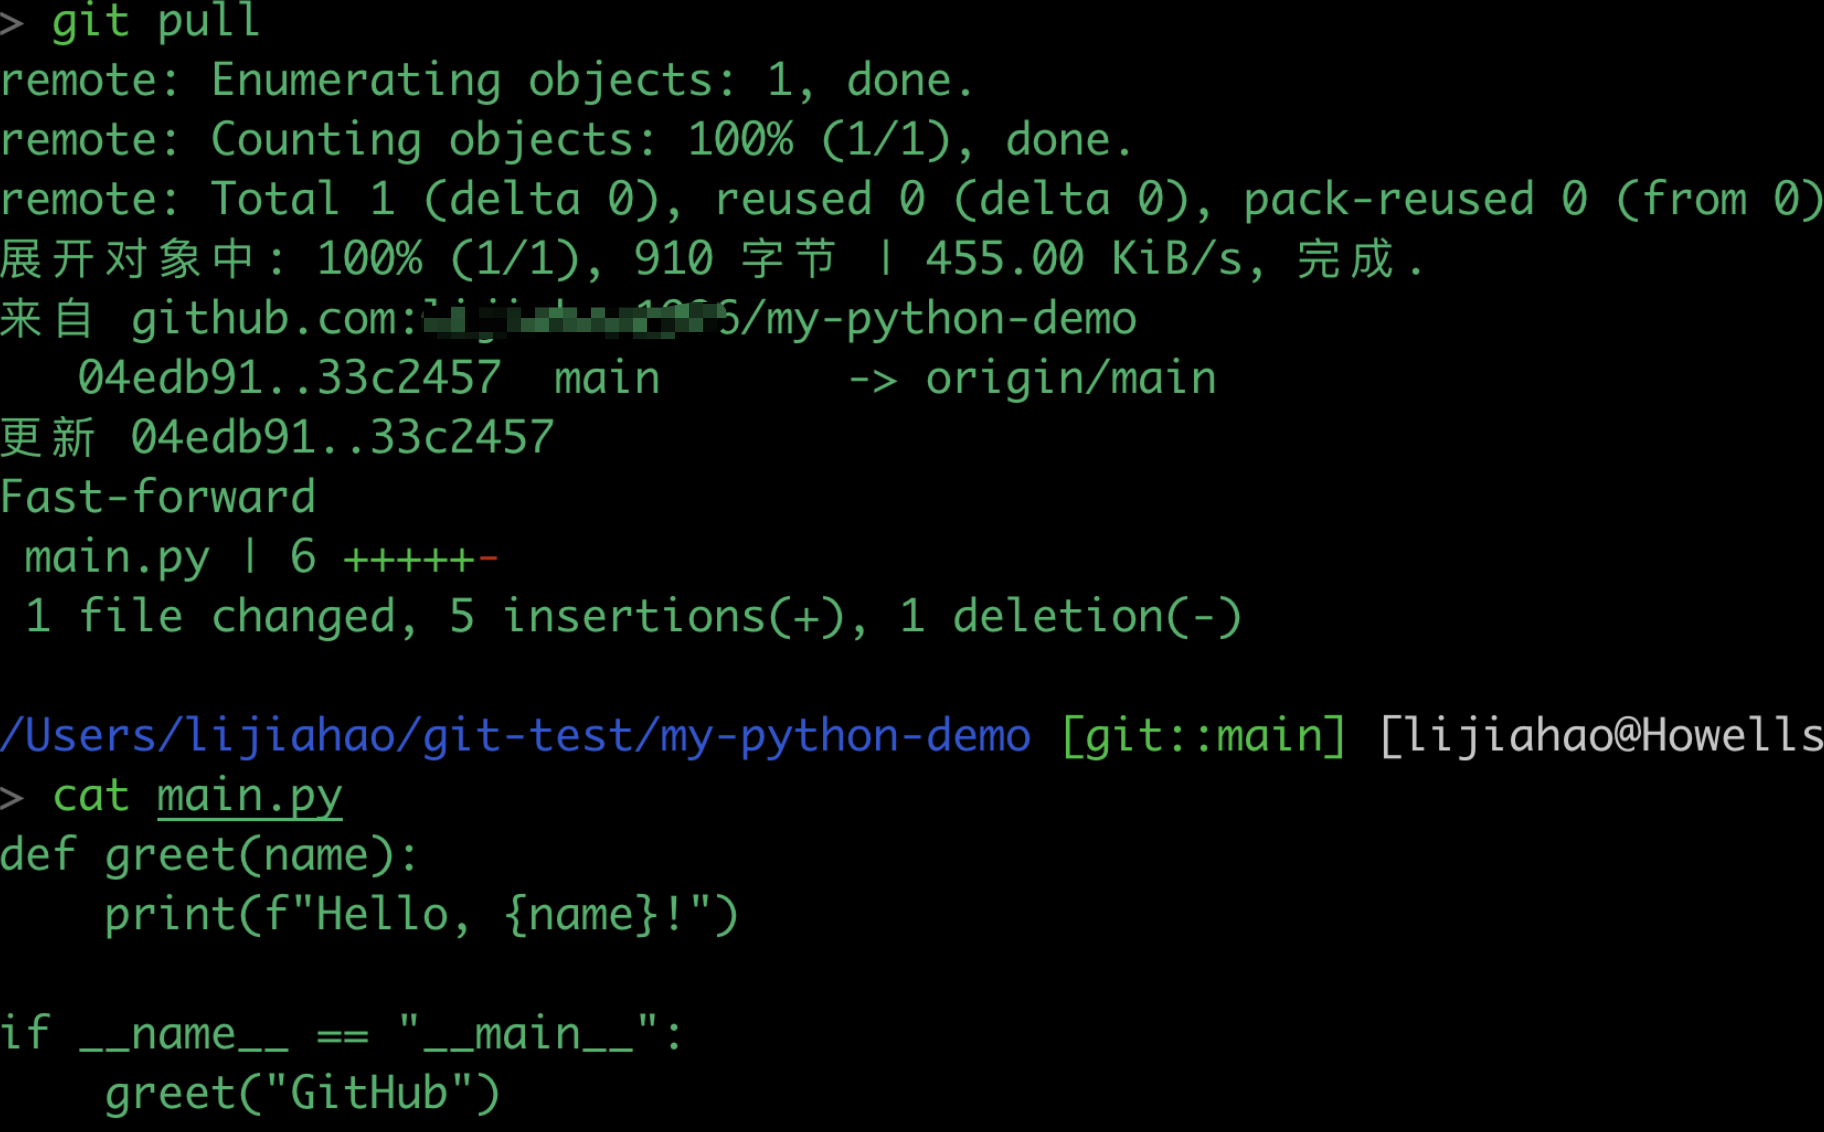
这样本地的 main 分支也更新了,包含了新功能
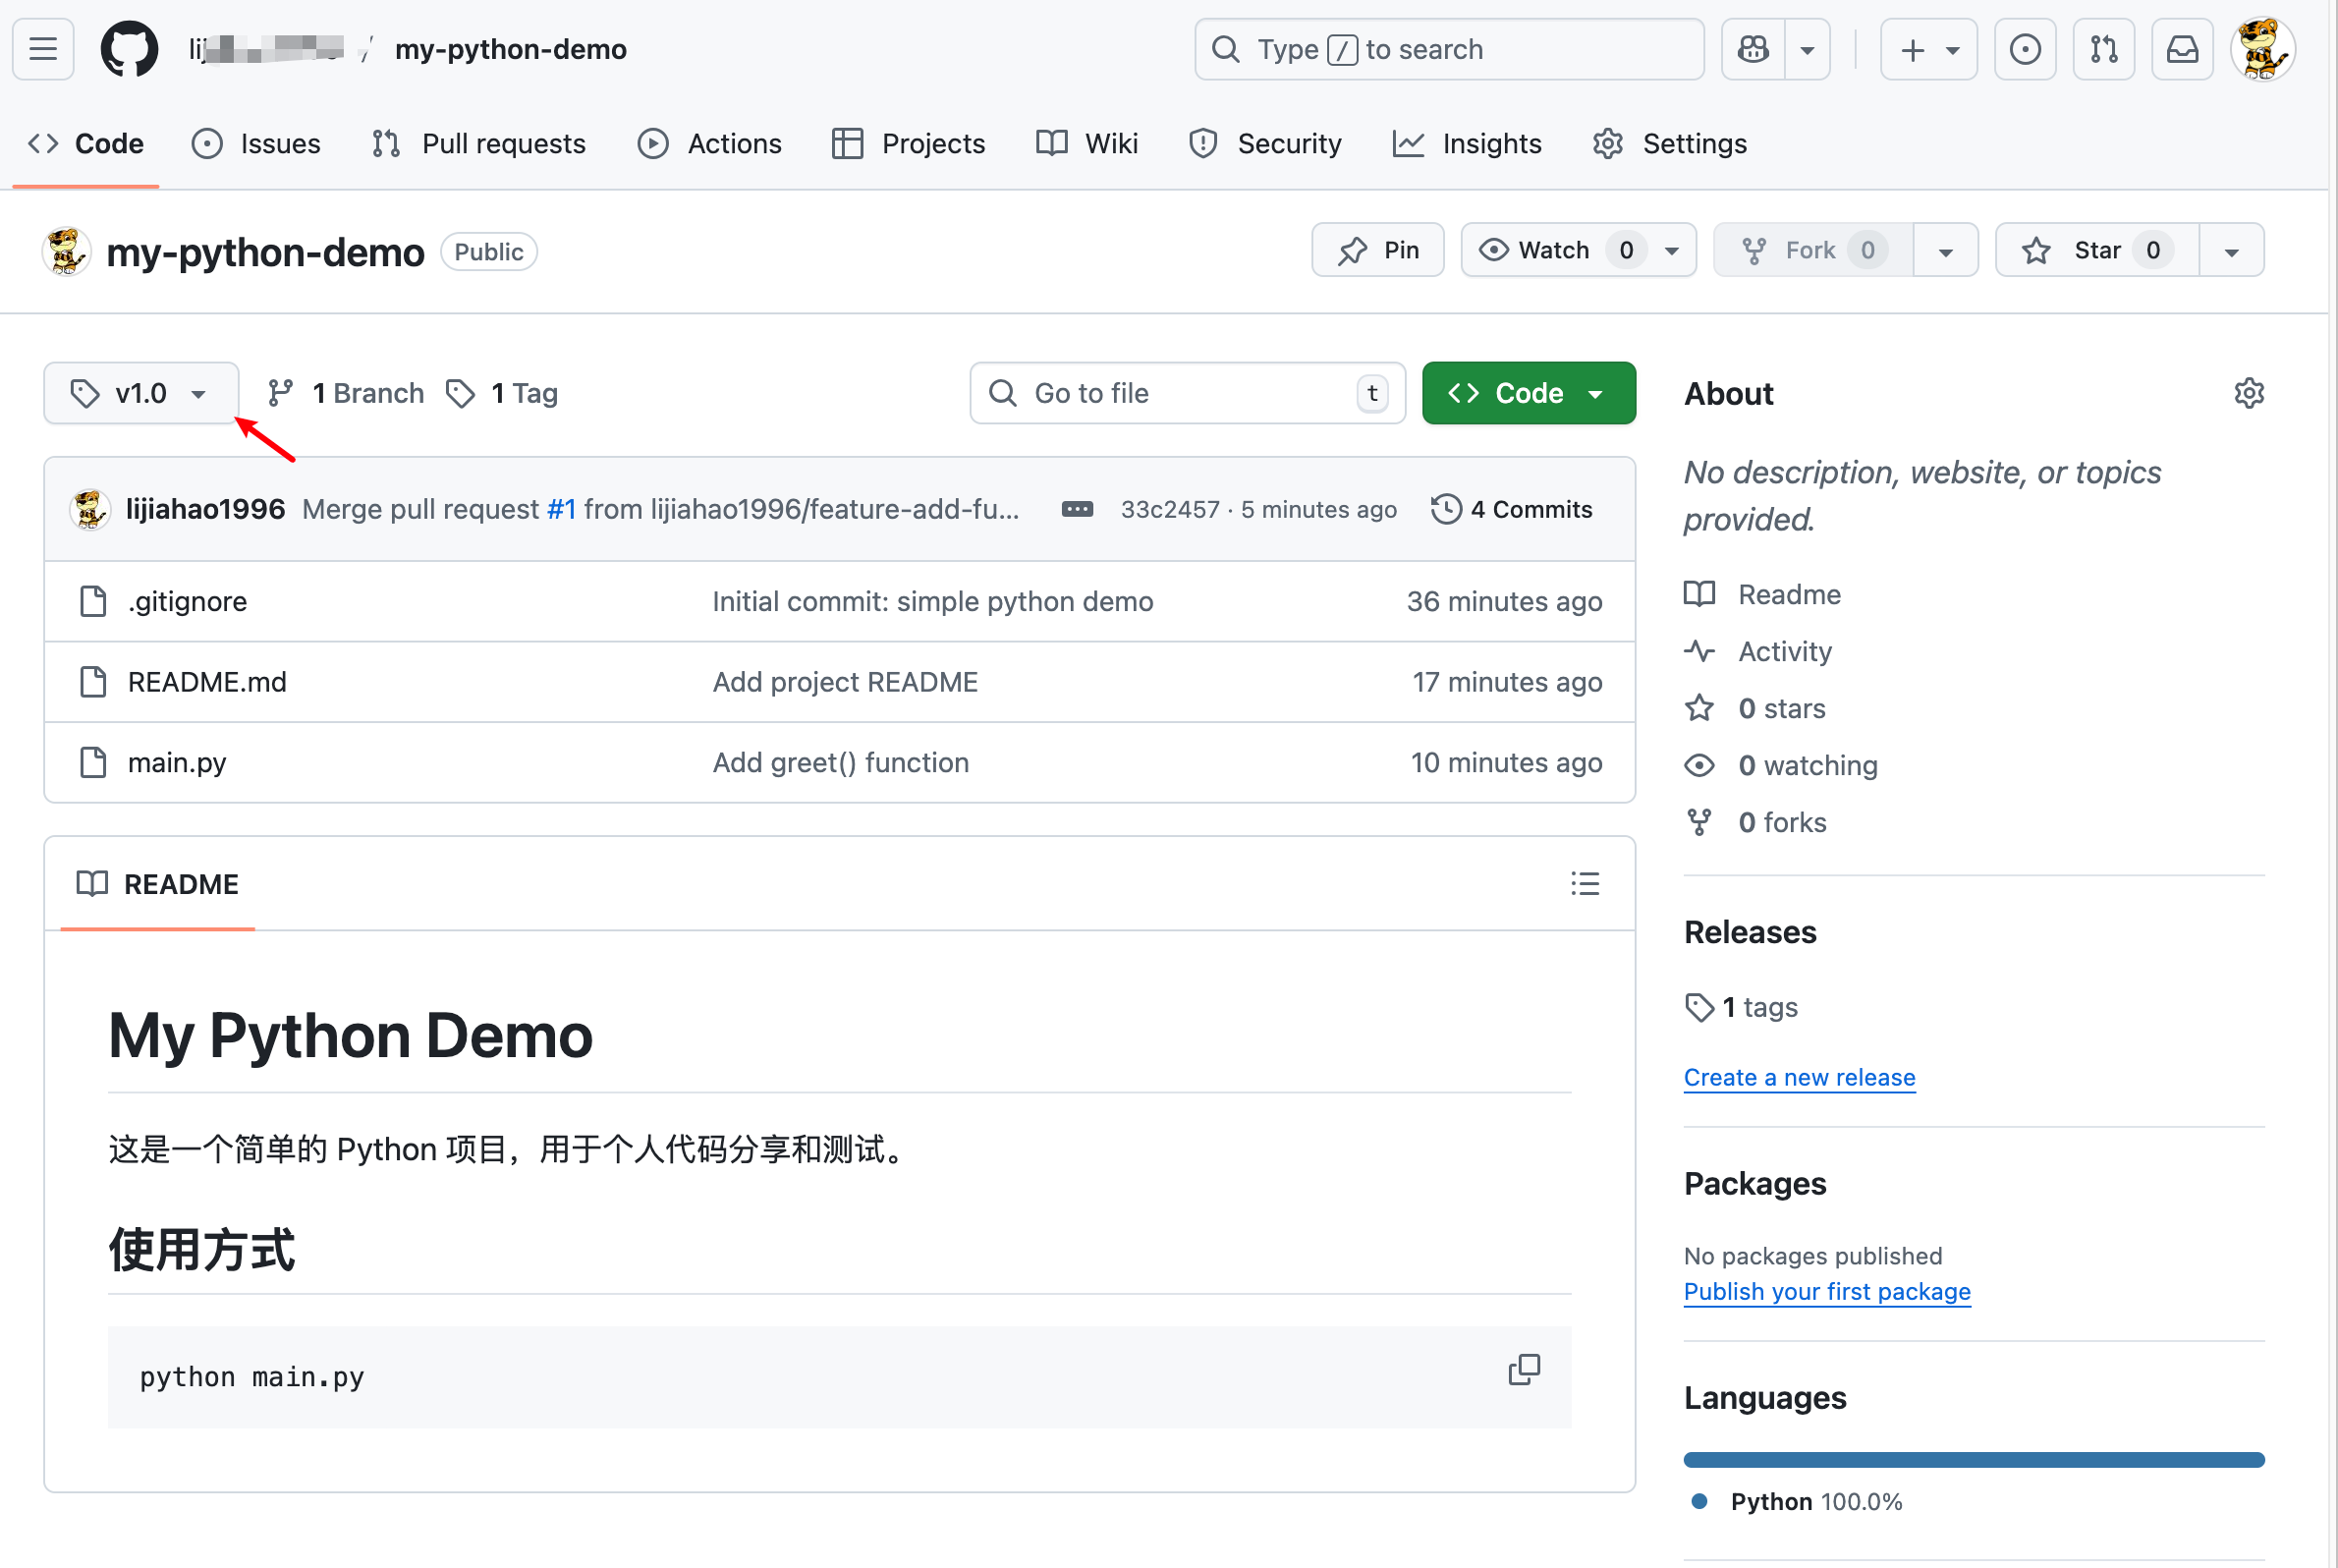
给版本打个标签
git tag v1.0
git push origin v1.0
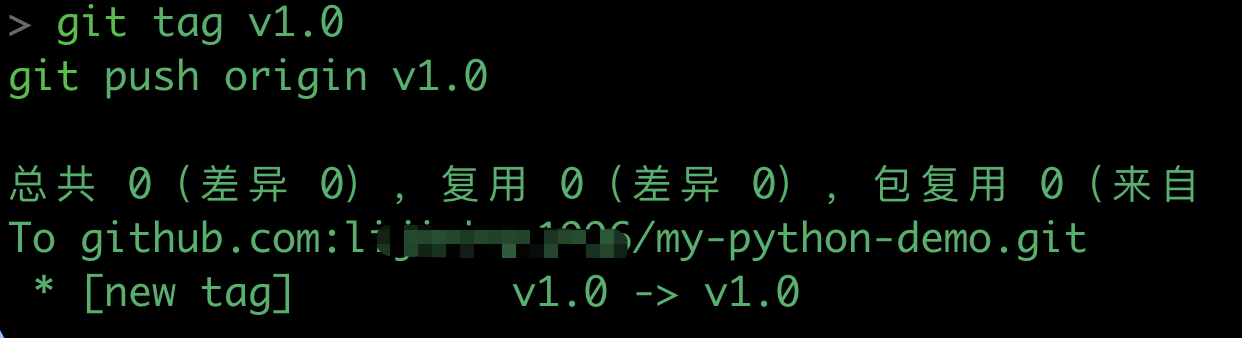
GitHub 上会自动把这个标签识别成「Release 版本」,方便以后回滚或下载。
个人 Python 项目模板仓库
下面开始详细讲解下Github 模板
以后你每次想开始一个新项目,直接在 GitHub 上点「Use this template」就能快速创建新项目,省去重复搭建的麻烦
项目模板结构预览
my-python-template/
├── .gitignore
├── LICENSE
├── README.md
├── requirements.txt
├── src/
│   └── main.py
└── tests/
    └── test_main.py
文件说明:
.gitignore:忽略缓存、虚拟环境等不必要上传的文件LICENSE:开源许可证(比如 MIT,方便公开项目)README.md:项目说明requirements.txt:依赖列表src/:项目源代码(便于管理)tests/:单元测试目录(哪怕你暂时不用,也建议保留)
本地创建模板仓库
你可以先在本地做一遍,之后再推送到 GitHub 并设置为「模板」。
创建项目目录
mkdir my-python-template
cd my-python-template
创建基础文件
.gitignore
__pycache__/
*.pyc
.env
.venv/
venv/LICENSE(使用 MIT 协议)
cat > LICENSE <<EOF
MIT License

Copyright (c) $(date +%Y) $(whoami)

Permission is hereby granted, free of charge, to any person obtaining a copy
...
EOF
也可以后面在 GitHub 上点「Add license」自动生成
README.md
# 🐍 My Python Project Template

这是一个轻量的 Python 项目模板,适合个人小工具、代码分享、练习项目。

## 📦 使用方式

```bash
# 安装依赖
pip install -r requirements.txt

# 运行主程序
python src/main.py

# 🧪 运行测试
pytest
requirements.txt
这里写项目依赖,比如:
requests==2.31.0src/main.py
mkdir src
echo "def main():
    print('Hello from my Python template!')

if __name__ == '__main__':
    main()" > src/main.py
tests/test_main.py
mkdir tests
echo "from src.main import main

def test_main_output(capsys):
    main()
    captured = capsys.readouterr()
    assert 'Hello' in captured.out
" > tests/test_main.py
初始化 Git 并提交
git init
git add .
git commit -m “Initial commit: Python project template”
推送到 GitHub 并设为模板
- 登陆 GitHub,点击右上角 ➕ → New repository
- 仓库名称:
my-python-template - 不勾选初始化选项 → 点击「Create repository」
本地绑定远程仓库并推送
git remote add origin git@github.com:你的用户名/my-python-template.git
git branch -M main
git push -u origin main
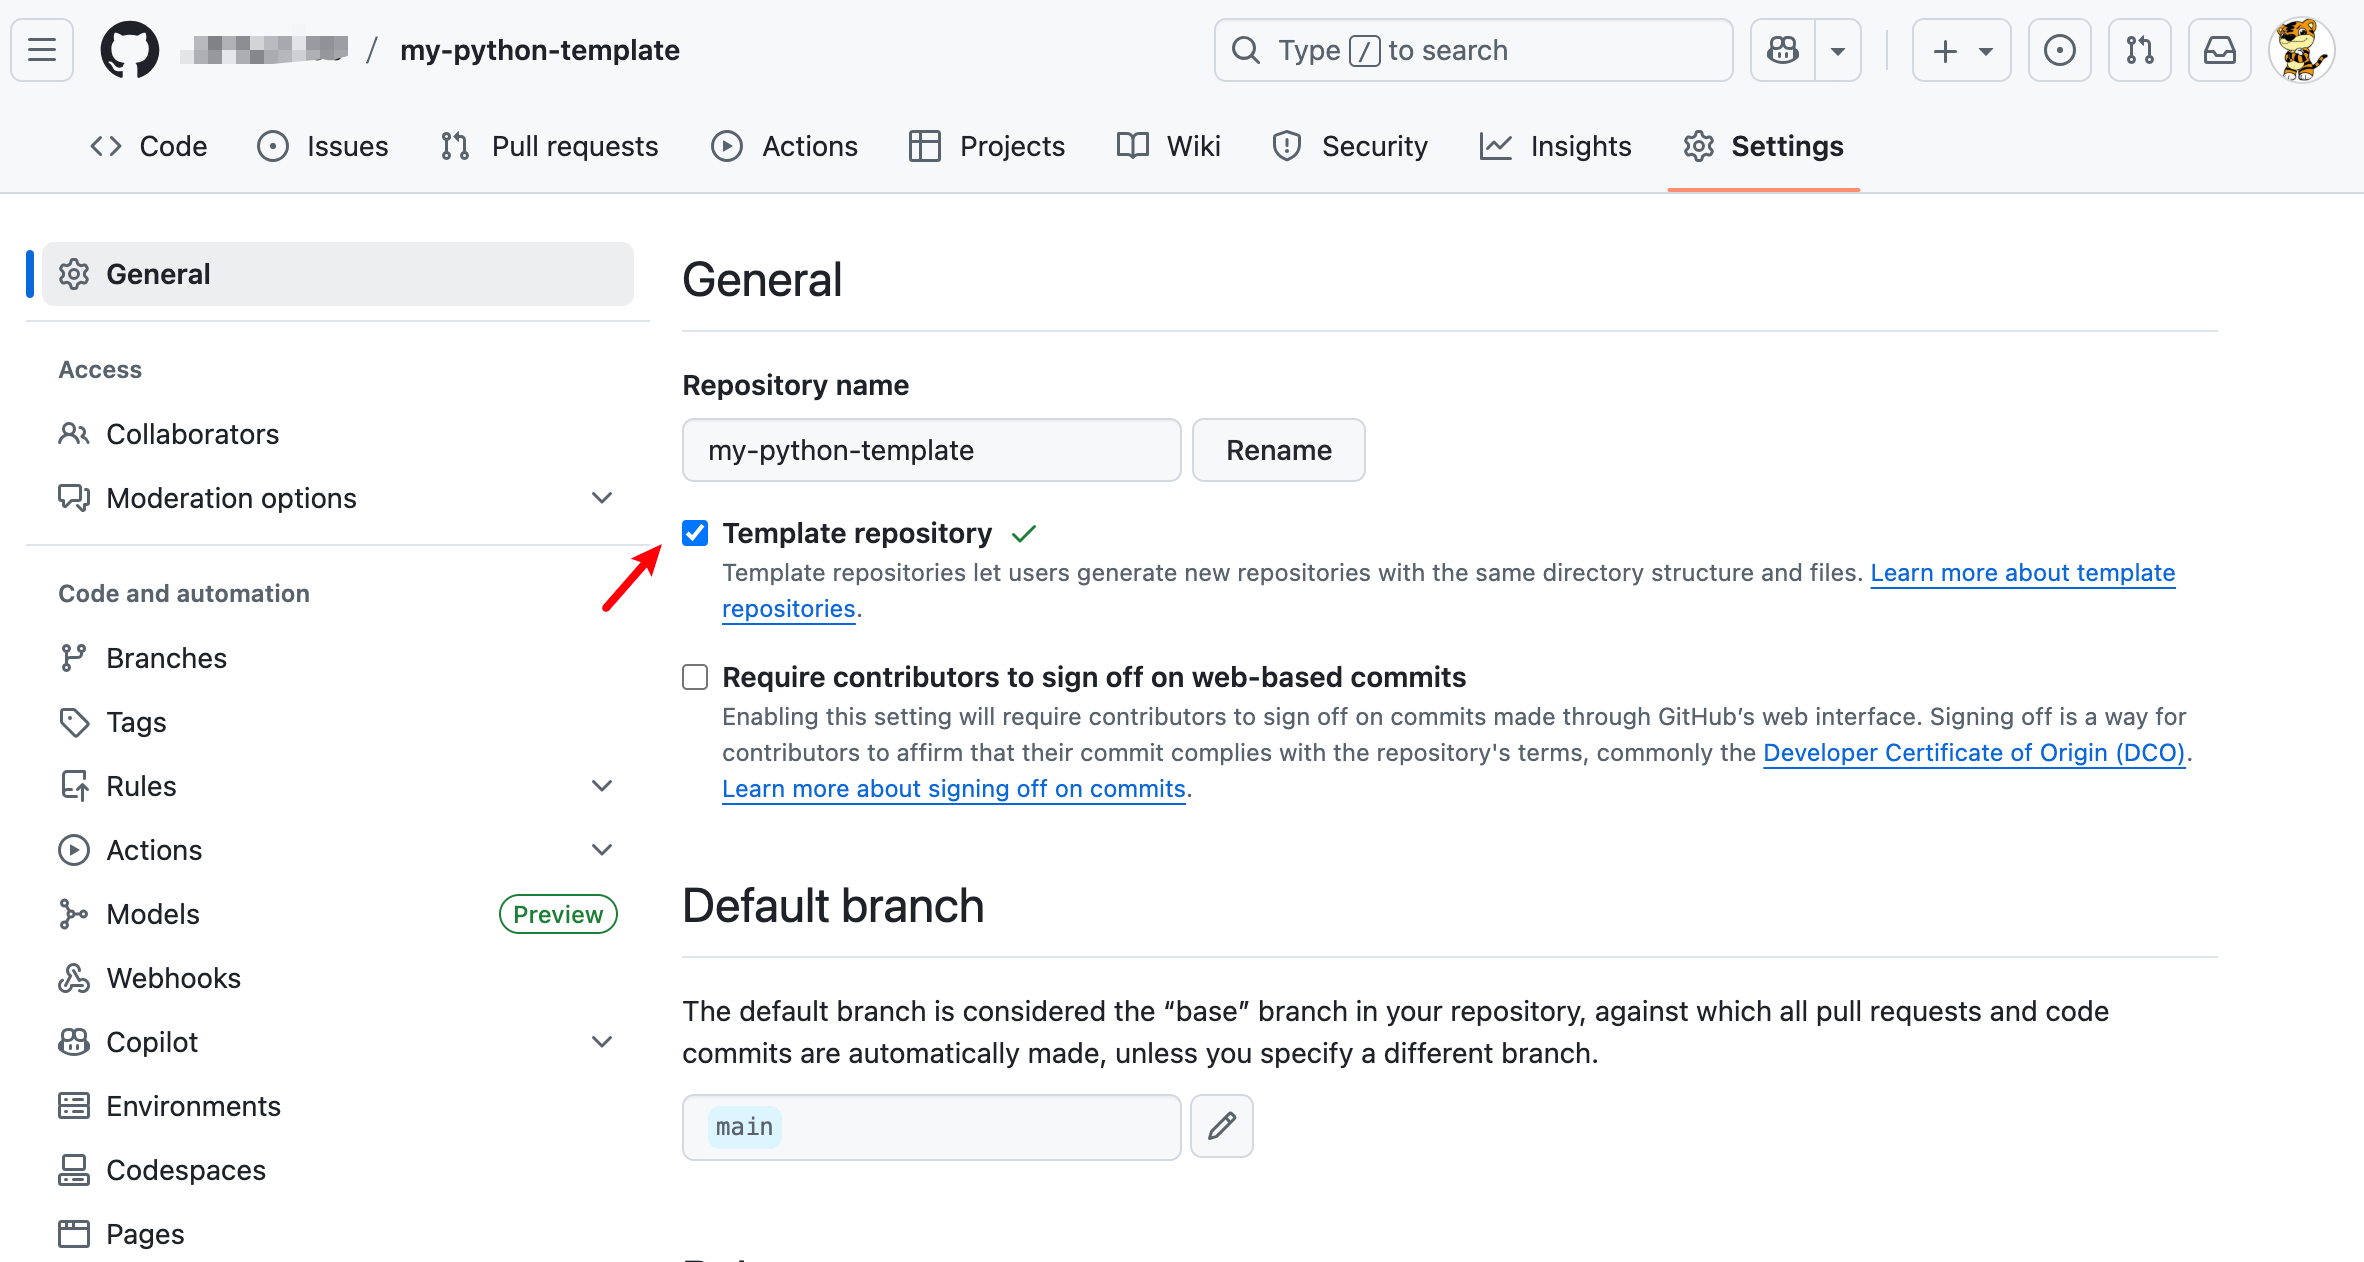
把这个仓库设置为「模板」
在 GitHub 仓库页面:
- 点击「⚙️ Settings」
- 在「General」页面下,勾选 Template repository
这时你就得到了一个可复用模板
下次启动新项目
以后想创建新项目,直接:
- 打开
my-python-template仓库 - 点击绿色「Use this template」按钮 → 选择「Create a new repository」
- 输入新项目名字,比如
my-cool-tool - 点击「Create repository」
git clone新仓库开始开发即可 🥳


企业项目 Demo
这里构建一个可直接推到 GitHub 并能自动运行 CI/CD 的企业级 Python 模板
这个模板结构非常完整,含:
- 自动化-> GitHub Actions 自动测试 (
ci.yml) - 规范化-> flake8 + black + pytest 规范 & pre-commit 钩子(可选启用)
- 质量保证 -> pytest 测试
- 可视化 → README 带 “build passing” 徽章
- 法律安全 → LICENSE(MIT)
- 易用性 → 可直接运行,无需额外配置
项目结构总览
enterprise-python-template/
├── .github/
│   └── workflows/
│       └── ci.yml                # CI/CD 自动化工作流
├── .gitignore
├── .pre-commit-config.yaml       # 提交前自动格式化、lint
├── LICENSE
├── README.md
├── requirements.txt
├── setup.cfg                     # flake8 & pytest 配置
├── pyproject.toml                # black 配置、项目信息
├── src/
│   └── main.py
└── tests/
    └── test_main.py
各文件内容如下
1、GitHub Actions 自动测试(ci.yml)
作用:
- 自动在云端运行你的测试、代码规范检查等流程
- 每次 push / PR 都会触发,保证代码健康
为什么重要:
- 不依赖个人电脑环境
- 保证每次提交都符合规范
- 早发现 bug 或不规范代码
.github/workflows/ci.yml
name: CI

on:
  push:
    branches: [ main ]
  pull_request:
  workflow_dispatch:

jobs:
  build:
    runs-on: ubuntu-latest

    steps:
      - name: Checkout code
        uses: actions/checkout@v4

      - name: Setup Python
        uses: actions/setup-python@v5
        with:
          python-version: '3.11'

      - name: Install dependencies
        run: |
          python -m pip install --upgrade pip
          pip install -r requirements.txt
          pip install -e .
          pip install flake8 black pytest

      - name: Lint code
        run: |
          echo "Running flake8..."
          flake8 src tests
          echo "Running black check..."
          black --check src tests

      - name: Run tests
        run: pytest -v
典型内容讲解:
每个 step 都是一个动作(checkout、安装依赖、检查代码、跑测试)
jobs:
  build:
    runs-on: ubuntu-latest
    steps:
      - uses: actions/checkout@v4      # 拉取仓库代码
      - uses: actions/setup-python@v5 # 设置 Python 环境
      - run: pip install -r requirements.txt -e .
      - run: flake8 src tests           # 代码风格检查
      - run: black --check src tests    # 格式化检查
      - run: pytest -v                  # 单元测试
.gitignore
__pycache__/
*.pyc
.env
.venv/
venv/
.idea/
.DS_Store
2、flake8 + black + pytest
| 工具 | 作用 |
|---|---|
| flake8 | 检查代码是否符合 Python 风格规范(PEP8)和常见错误 |
| black | 自动格式化代码,保证统一风格 |
| pytest | 执行单元测试,验证程序逻辑是否正确 |
3、pre-commit 钩子(可选启用)
作用:
- 在本地 git commit 之前自动运行工具,比如 flake8、black、pytest
- 防止提交不规范或有 bug 的代码
.pre-commit-config.yaml
repos:
  - repo: https://github.com/psf/black
    rev: 24.3.0
    hooks:
      - id: black

  - repo: https://github.com/pycqa/flake8
    rev: 7.0.0
    hooks:
      - id: flake8
(本地启用)
pip install pre-commit
pre-commit install

4、README 带 “build passing” 徽章
作用:
- 在 README 上显示 CI 流程状态(测试是否通过)
- 直观告诉别人这个项目“健康”
示例 Markdown:
[](https://github.com/USERNAME/enterprise-python-template/actions)- CI 状态绿 →
build passing - 红 →
build failing - 对开源/企业项目都是最佳实践
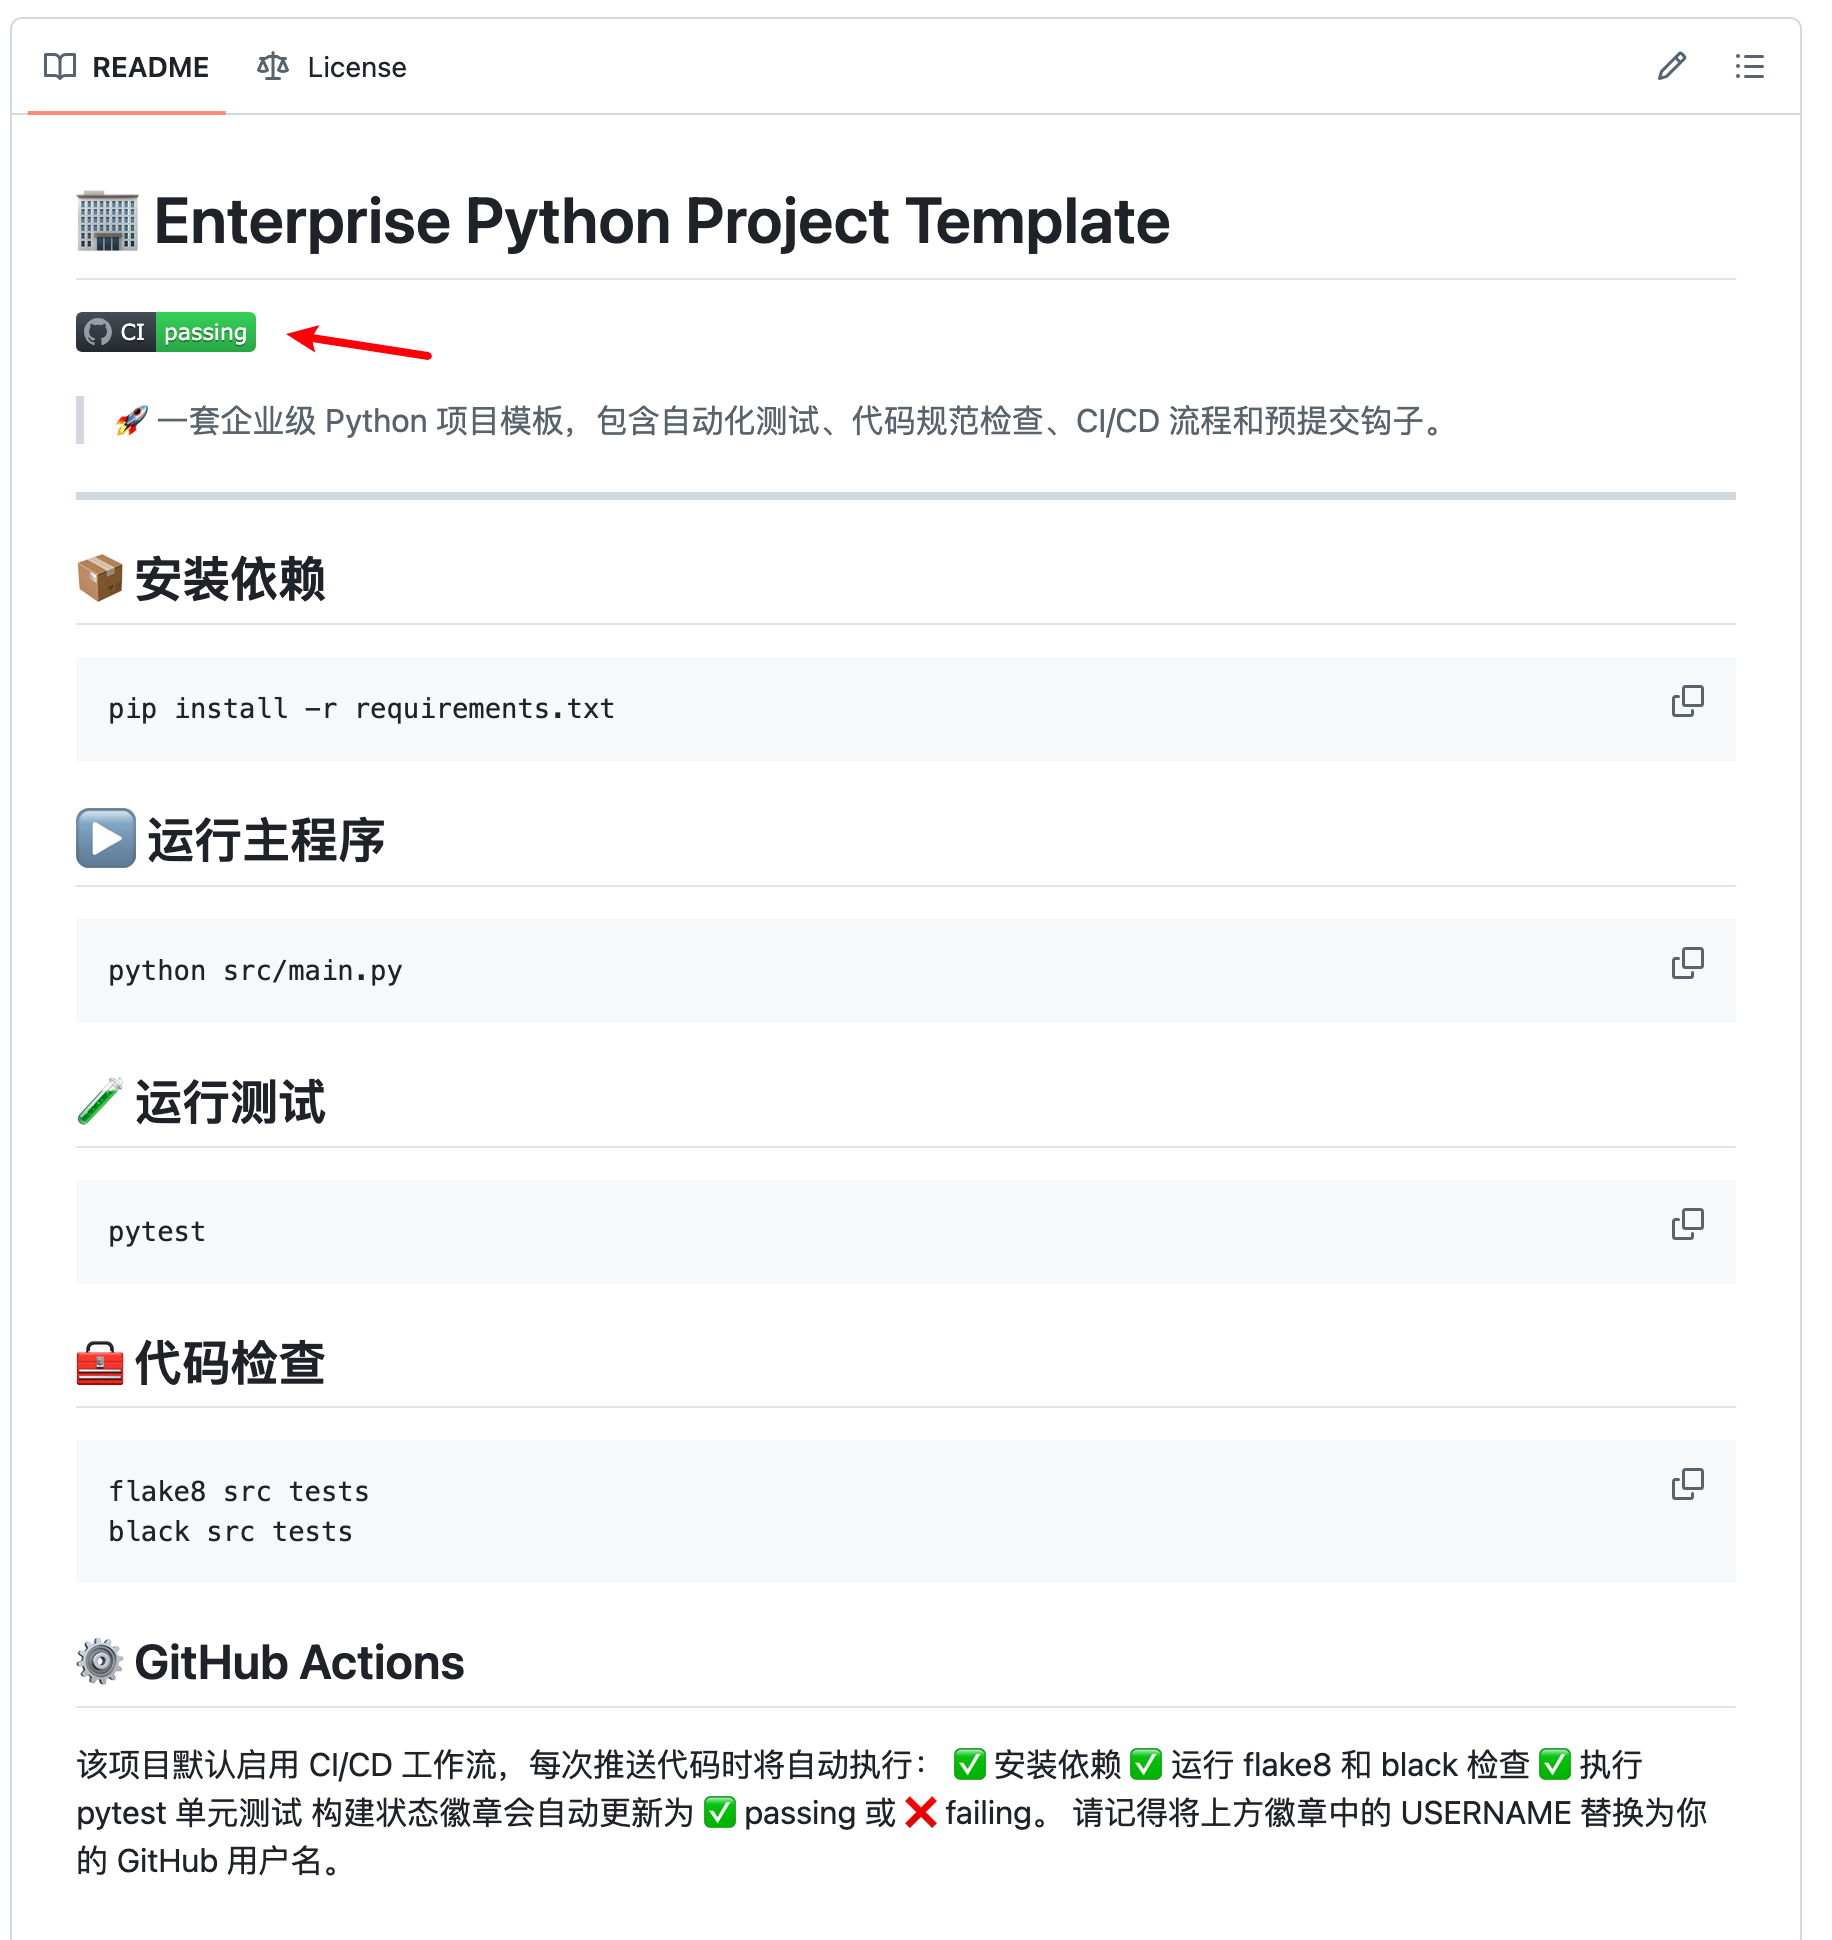
README.md
# 🏢 Enterprise Python Project Template
[](https://github.com/USERNAME/enterprise-python-template/actions)
> 🚀 一套企业级 Python 项目模板,包含自动化测试、代码规范检查、CI/CD 流程和预提交钩子。
---
## 📦 安装依赖
```bash
pip install -r requirements.txt
```
## ▶️ 运行主程序
```bash
python src/main.py
```
## 🧪 运行测试
```bash
pytest
```
## 🧰 代码检查
```bash
flake8 src tests
black src tests
```
## ⚙️ GitHub Actions
该项目默认启用 CI/CD 工作流,每次推送代码时将自动执行:
✅ 安装依赖
✅ 运行 flake8 和 black 检查
✅ 执行 pytest 单元测试
构建状态徽章会自动更新为 ✅ passing 或 ❌ failing。
请记得将上方徽章中的 USERNAME 替换为你的 GitHub 用户名。5、LICENSE(MIT)
作用:
- 告诉别人你允许他们使用/修改/分发你的代码
- MIT 非常宽松,只需保留版权信息
企业级意义:
- 明确法律责任和开源条款
- 避免版权纠纷
LICENSE
MIT License

Copyright (c) 2025 Li Jiahao

Permission is hereby granted, free of charge, to any person obtaining a copy
of this software and associated documentation files (the "Software"), to deal
in the Software without restriction...
6、可直接运行,无需额外配置
- 包含
requirements.txt+setup.cfg/pyproject.toml pip install -r requirements.txt或pip install -e .就能在本地/CI 环境跑通- 企业级标准:新成员 clone 仓库后,开箱即用,无需手动配置路径或环境变量
requirements.txt
pytest==8.3.3
flake8==7.1.0
black==24.3.0
setup.cfg
[flake8]
max-line-length = 88
ignore = E203, W503
exclude = .git,__pycache__,venv

[tool:pytest]
testpaths = tests
pythonpath = .
pyproject.toml
[project]
name = "my-python-template"
version = "0.1.0"
description = "A production-ready Python project template with CI/CD."
authors = [{ name = "Li Jiahao" }]
requires-python = ">=3.10"

[tool.black]
line-length = 88

[build-system]
requires = ["setuptools", "wheel"]
build-backend = "setuptools.build_meta"
7、具体项目代码内容
src/main.py
def main():
    print("Hello from my Python enterprise template!")


if __name__ == "__main__":
    main()
tests/test_main.py
from src.main import main


def test_main_output(capsys):
    main()
    captured = capsys.readouterr()
    assert "Hello" in captured.out
操作推送
- 创建文件夹
mkdir my-python-template && cd my-python-template - 将上面文件复制进去
- 初始化 git 仓库
git init
git add .
git commit -m “Initial commit: enterprise python template” - 推送到 GitHub
git remote add origin https://github.com/<你的用户名>/my-python-template.git
git branch -M main
git push -u origin main
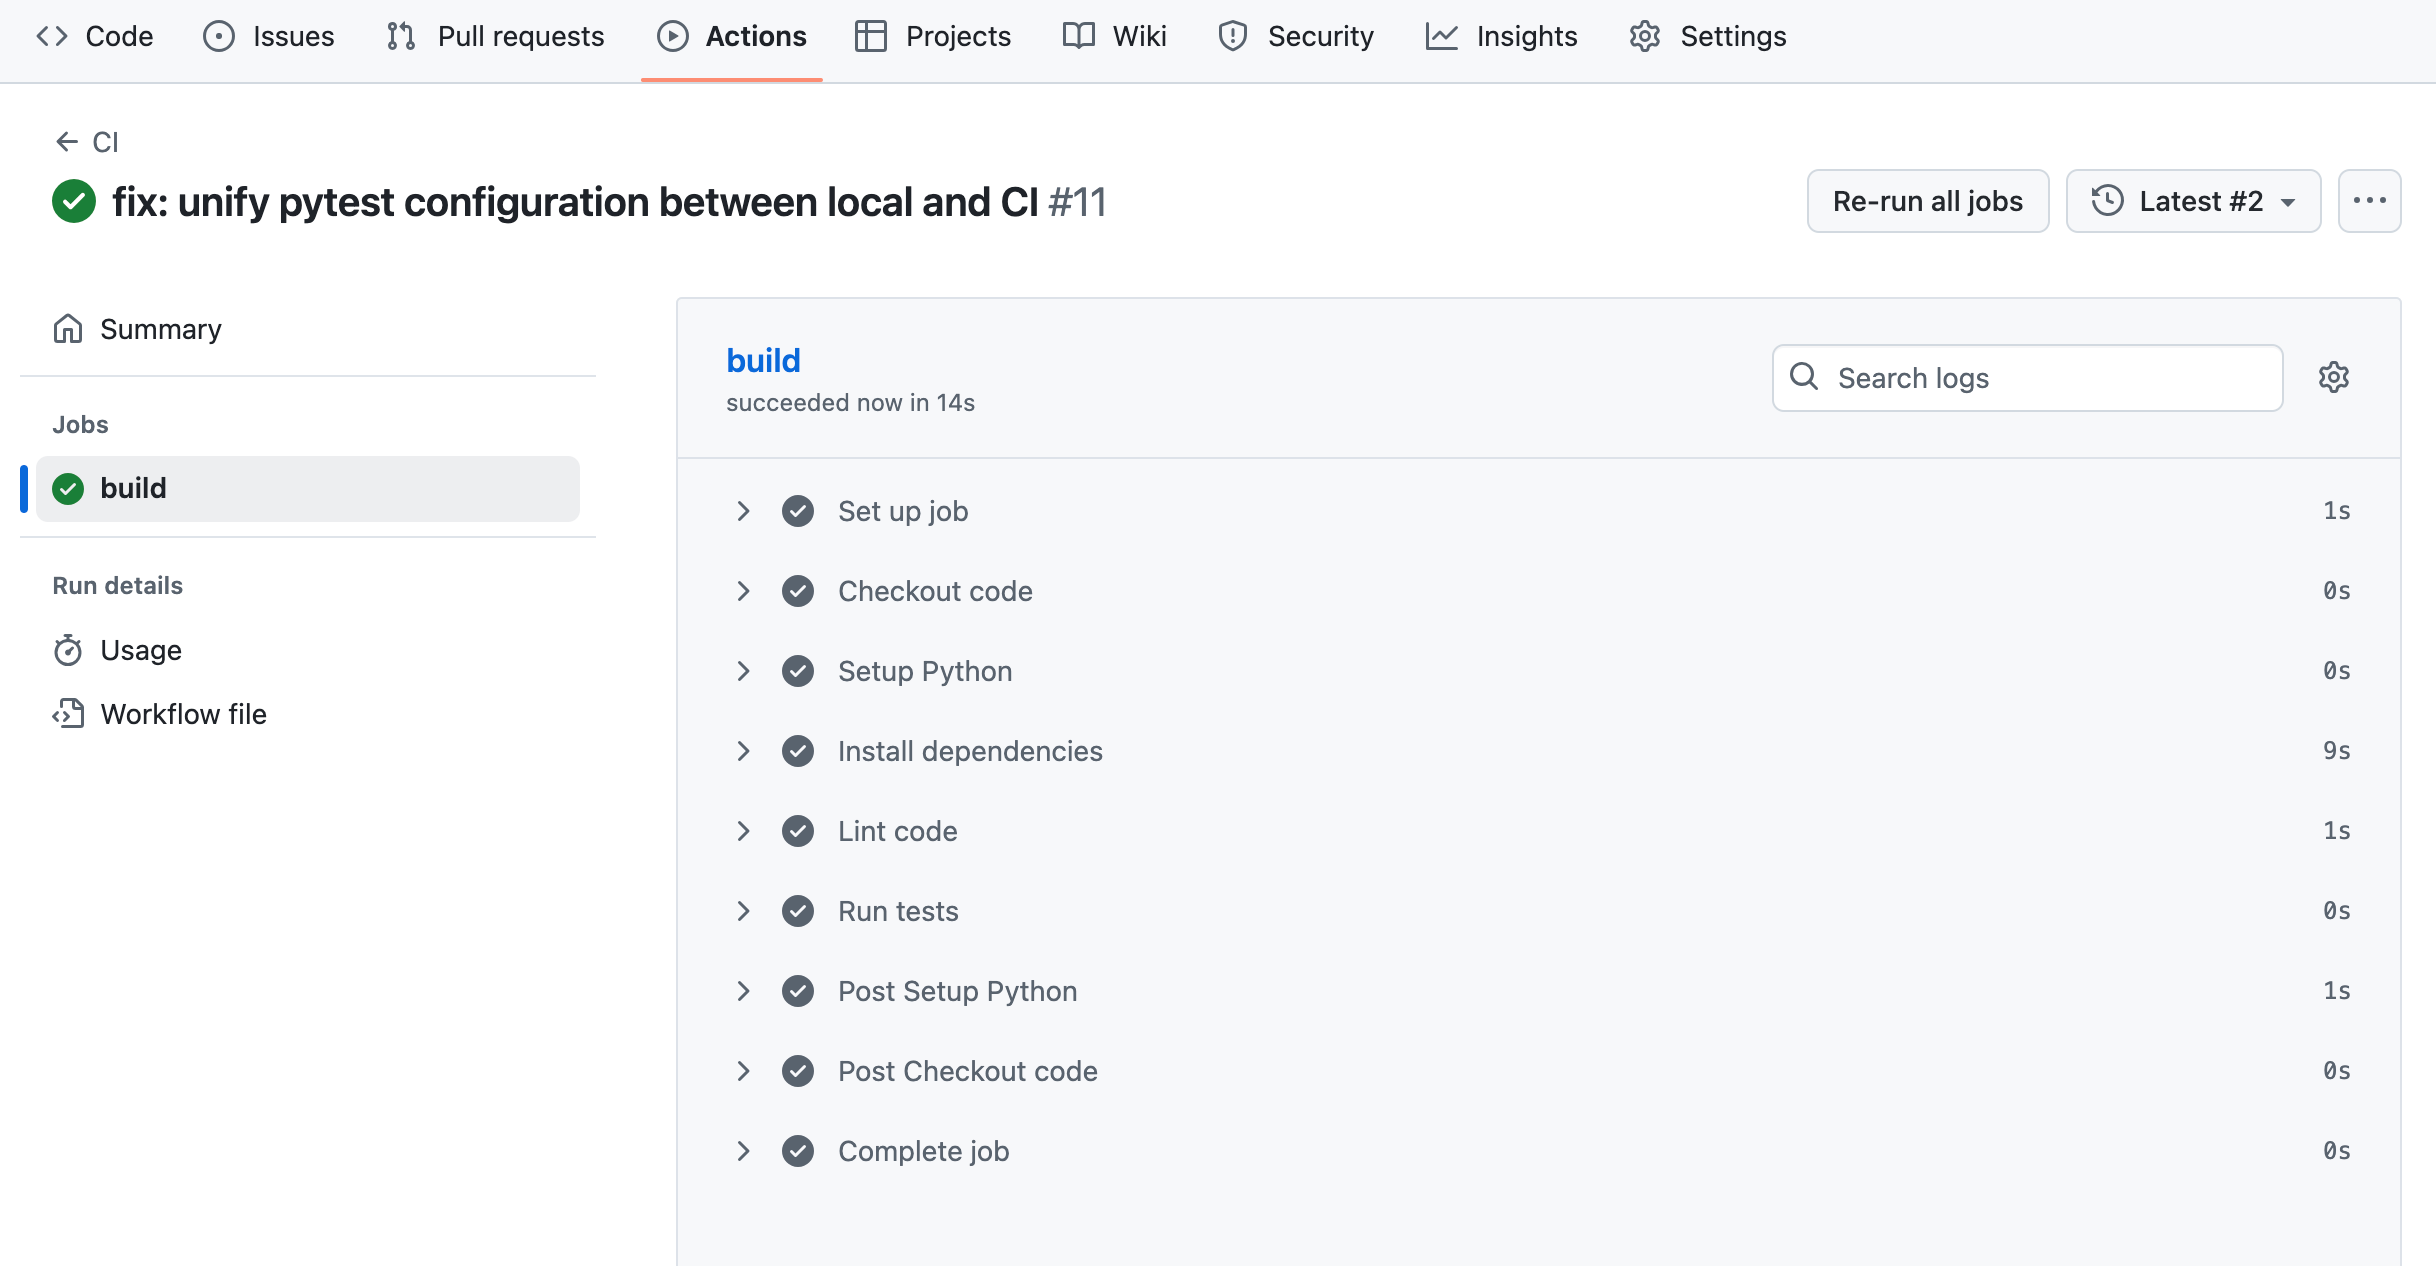
推上 GitHub 后的自动流程
- GitHub 检测到
.github/workflows/ci.yml - 自动启动 CI(测试 + Lint)
- 你可以在仓库的「Actions」页面看到实时日志
- 如果一切通过,README 中的徽章会变成 ✅ build passing
发布者:LJH,转发请注明出处:https://www.ljh.cool/43960.html