

URL 分发机制(URLconf)
path() 基础使用
- path(“路由/”, 视图函数, name=”命名”)
- 支持静态和动态参数(如
<int:id>)
示例:
blog/urls.py
from django.urls import path
from . import views

urlpatterns = [
    path('', views.index, name='index'),  # 主页
    path('post/<int:id>/', views.post_detail, name='post_detail'),  # 动态路径参数
]
在 Django 的 URL 配置中,name='post_detail' 是为 URL 模式命名的,这个命名在 Django 中的作用是 1、解耦 URL 路径和代码逻辑,避免硬编码。2、方便动态生成 URL,提高代码可维护性。常用在:
1、URL 反向解析(Reverse URL Lookup)
允许你在模板或 Python 代码中动态生成 URL,而不用硬编码 URL 路径。
<!-- html 文件,在模板中使用 -->
<a href="{% url 'post_detail' id=post.id %}">查看详情</a>

# 在 Python 代码中使用
from django.urls import reverse
url = reverse('post_detail', kwargs={'id': 1})  # 返回类似 '/post/1/'
如果以后 URL 模式改变(比如从 post/<int:id>/ 改成 articles/<int:id>/),你只需要修改 urls.py,而不用修改所有模板和视图中的硬编码 URL。
2、在重定向(Redirect)中使用
在视图函数中可以使用命名的 URL 进行重定向:
from django.shortcuts import redirect
return redirect('post_detail', id=5)  # 重定向到 '/post/5/'
views.py
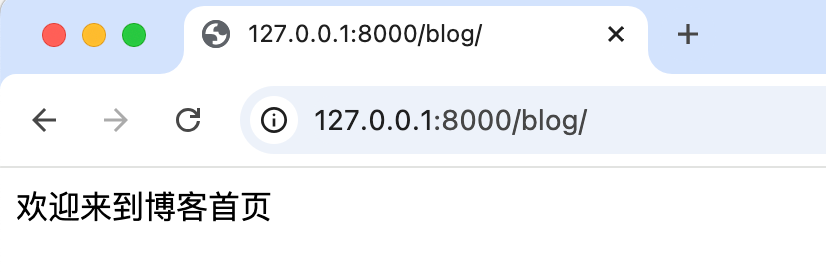
from django.http import HttpResponse
def index(request):
return HttpResponse("欢迎来到博客首页")
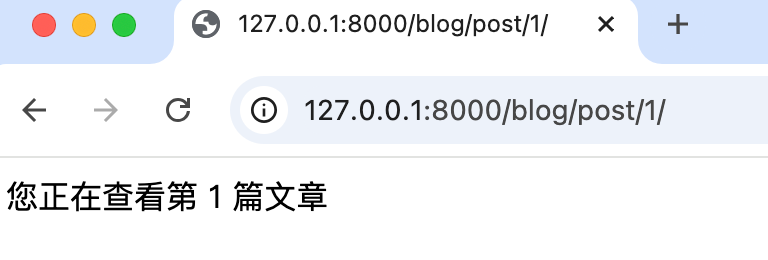
def post_detail(request, id):
return HttpResponse(f"您正在查看第 {id} 篇文章")结果展示:
re_path()(旧版叫 url())正则表达式路由
- 更灵活的路径匹配(例如:年份、slug)
示例:
urls.py
from django.urls import re_path
from . import views
urlpatterns += [
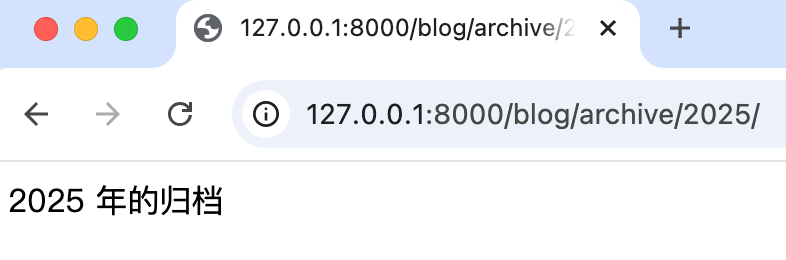
re_path(r'^archive/(?P<year>[0-9]{4})/$', views.archive_by_year, name='archive_by_year'),
]views.py
def archive_by_year(request, year):
    return HttpResponse(f"{year} 年的归档")
r'^archive/(?P<year>[0-9]{4})/$' 匹配讲解:
r表示这是一个原始字符串(raw string),避免 Python 对反斜杠的特殊处理^表示匹配字符串的开始archive/是字面匹配,必须精确匹配这部分(?P<year>[0-9]{4})是命名捕获组:?P<year>表示将捕获的内容命名为 “year”,这会要求views.py中必须接受传入的“year”参数[0-9]{4}表示匹配恰好 4 个数字字符(0-9)
/是字面匹配的斜杠$表示匹配字符串的结束
include() 模块化拆分
主项目调用子 app 的 urls.py
项目根目录的 urls.py:
from django.contrib import admin
from django.urls import path, include

urlpatterns = [
    path('admin/', admin.site.urls),
    path('blog/', include('blog.urls')),  # 引入 blog 子应用的路由
]
命名路由 + 反向解析
什么是命名路由(name 参数)
Django 中的路由是通过 path() 来注册的,比如:
from django.urls import path
from . import views

urlpatterns = [
    path('posts/<int:id>/', views.post_detail, name='post_detail'),  # 👈 这里的 name 参数就是“命名路由”
]
这段代码的意思是:
- 访问 URL
/posts/3/会执行views.post_detail(request, id=3) - 并且这个路由有个别名叫做
'post_detail'
有了这个 name,我们就可以用名字反向生成 URL 地址,这叫做“反向解析”。
什么是反向解析(reverse 和 {% url %})
1、在视图函数里:用 reverse()
比如你想在视图函数中跳转到帖子详情页(比如 /posts/3/):
from django.urls import reverse
from django.shortcuts import redirect

def go_to_post(request):
    url = reverse('post_detail', kwargs={'id': 3})  # 👈 根据路由名称和参数,反向生成 URL
return redirect(url)'post_detail'是路由名称kwargs={'id': 3}表示这个 URL 中的<int:id>是 3reverse()返回的就是/posts/3/- 然后
redirect()会跳转过去
2、在模板中:用 {% url %} 标签
如果你想在页面中放一个跳转链接:
<a href="{% url 'post_detail' id=3 %}">查看第三篇文章</a>这段模板代码会被渲染成:
<a href="/posts/3/">查看第三篇文章</a>方便之处:不需要自己拼接 URL,只要写清楚名字和参数就好
实战 demo:
blog/urls.py
from django.urls import path
from . import views

urlpatterns = [
    path('posts/<int:id>/', views.post_detail, name='post_detail'),  # 命名路由
    path('go/', views.go_to_post),  # 跳转用的视图
    path('', views.post_list, name='post_list'),  # 首页文章列表
]
blog/views.py
from django.shortcuts import render, redirect
from django.urls import reverse
from django.http import HttpResponse

def post_detail(request, id):
    return HttpResponse(f"你正在查看第 {id} 篇文章")

def go_to_post(request):
    # 模拟跳转到第 3 篇文章
    url = reverse('post_detail', kwargs={'id': 3})
    return redirect(url)

def post_list(request):
    return render(request, 'blog/post_list.html')
templates/blog/post_list.html
<!DOCTYPE html>
<html lang="zh-CN">
<head>
<meta charset="UTF-8">
<title>文章列表</title>
</head>
<body>
<h1>博客文章列表</h1>
<ul>
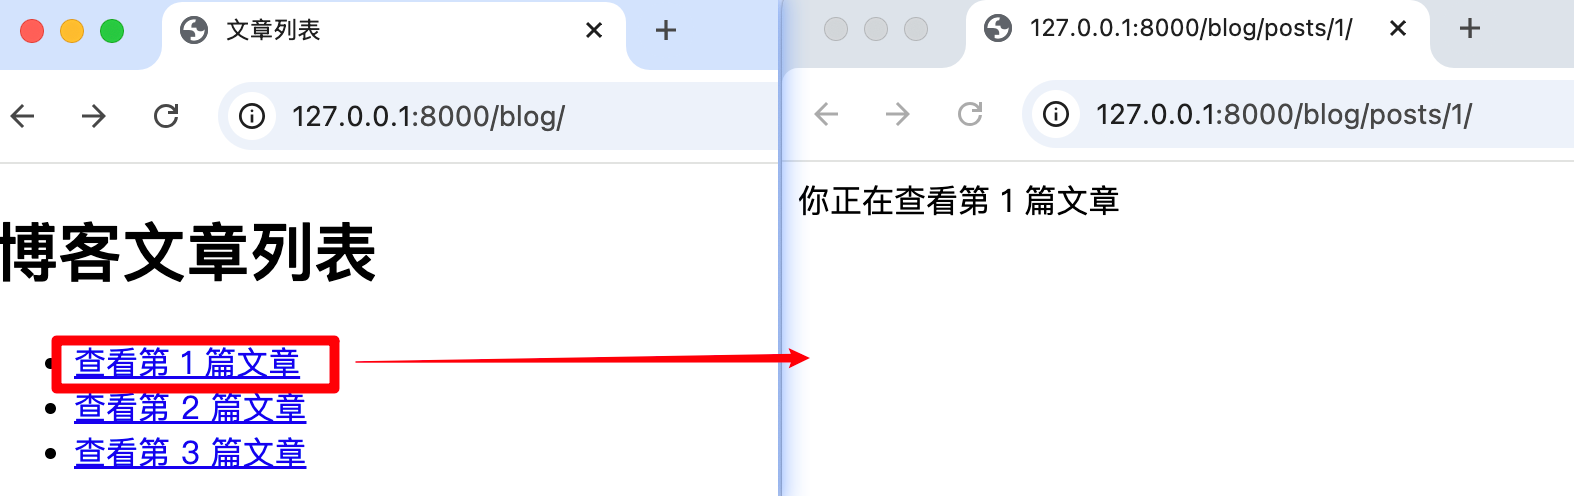
<li><a href="{% url 'post_detail' id=1 %}">查看第 1 篇文章</a></li>
<li><a href="{% url 'post_detail' id=2 %}">查看第 2 篇文章</a></li>
<li><a href="{% url 'post_detail' id=3 %}">查看第 3 篇文章</a></li>
</ul>
</body>
</html>结果演示:
访问路径为/go/,使用 reverse() 反向解析后,跳转到 /posts/3/
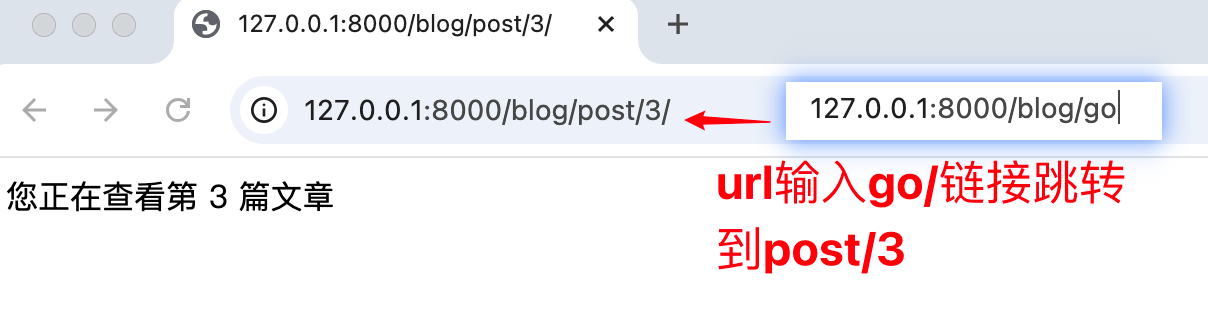
/posts/3/ 会显示“你正在查看第 3 篇文章”
/目录下渲染模板,用 {% url %} 生成多个跳转链接
视图函数与 HTTP 响应
HttpResponse
最基本的返回
from django.http import HttpResponse
def simple_response(request):
    return HttpResponse("这是一个简单响应")
render()
知识点:
- 渲染模板 + 传值
render() 是什么?它做了什么?
定义:
render(request, template_name, context=None)render() 是 Django 提供的快捷函数,用于:
- 加载指定模板(HTML 文件)
- 使用
context上下文中的变量进行渲染 - 返回一个包含渲染结果的
HttpResponse
底层其实这样
from django.template import loader
from django.http import HttpResponse

template = loader.get_template("blog/index.html")
html = template.render({"posts": posts}, request)
return HttpResponse(html)
作用流程:
- 找到模板文件(路径是:
templates/blog/index.html) - 把视图中传入的
posts列表交给模板 - 模板用
{% for post in posts %}遍历并展示 - 最后返回一个完整 HTML 页面给浏览器
完整示例:博客首页
models.py(定义数据模型)
# blog/models.py
from django.db import models

class Post(models.Model):
    title = models.CharField(max_length=100)
    content = models.TextField()

    def __str__(self):
        return self.title
views.py(视图函数)
# blog/views.py
from django.shortcuts import render
from .models import Post

def index(request):
    # 获取所有文章
    posts = Post.objects.all()

    # 渲染模板并传入上下文变量
    return render(request, "blog/index.html", {"posts": posts})
urls.py(路由系统)
# blog/urls.py
from django.urls import path
from . import views

urlpatterns = [
    path("", views.index, name="post_index"),  # 命名路由
]
# 项目根目录 urls.py
from django.contrib import admin
from django.urls import path, include
urlpatterns = [
path('admin/', admin.site.urls),
path('blog/', include("blog.urls")), # 引入 blog 应用的路由
]templates/blog/index.html
<!-- templates/blog/index.html -->
<!DOCTYPE html>
<html lang="zh-CN">
<head>
<meta charset="UTF-8">
<title>博客首页</title>
</head>
<body>
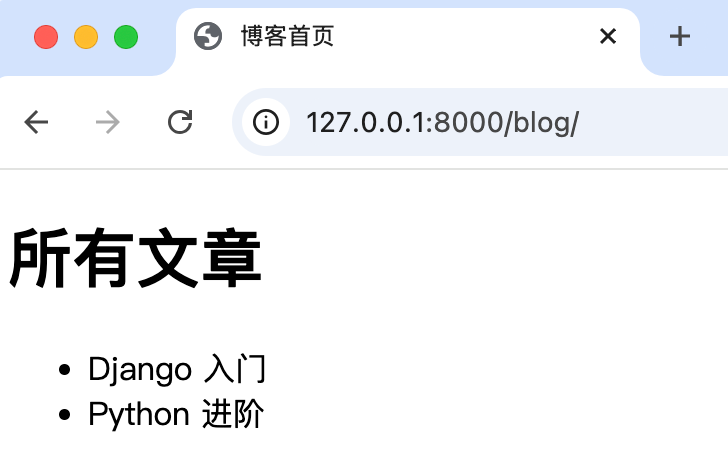
<h1>所有文章</h1>
<ul>
{% for post in posts %}
<li>{{ post.title }}</li>
{% empty %}
<li>暂无文章</li>
{% endfor %}
</ul>
</body>
</html>
用户访问 /posts/ → URL 交给 views.index → views.py 获取所有文章 Post.objects.all() → render() 渲染 blog/index.html → 模板中遍历 posts 显示标题 → 浏览器收到完整 HTML 页面
扩展:如果你准备实现文章详情页,那就该同时:
在 blog/urls.py 添加对应路由:
# blog/urls.py
from django.urls import path
from . import views

urlpatterns = [
    path("", views.index, name="post_index"),
    path("<int:id>/", views.detail, name="post_detail"),  # 加这个
]
在 blog/views.py 中添加 detail 视图:
# blog/views.py
from django.shortcuts import render, get_object_or_404
from .models import Post

def detail(request, id):
    post = get_object_or_404(Post, id=id)
    return render(request, "blog/detail.html", {"post": post})
新建模板 templates/blog/detail.html
<!-- templates/blog/detail.html -->
<!DOCTYPE html>
<html>
<head>
  <title>{{ post.title }}</title>
</head>
<body>
  <h1>{{ post.title }}</h1>
  <p>{{ post.content }}</p>
  <a href="{% url 'post_index' %}">返回首页</a>
</body>
</html>
修改 templates/blog/index.html
<!DOCTYPE html>
<html>
<head>
<title>所有文章</title>
</head>
<body>
<h1>所有文章</h1>
<ul>
{% for post in posts %}
<li>
<!-- 每个文章标题链接到详情页 -->
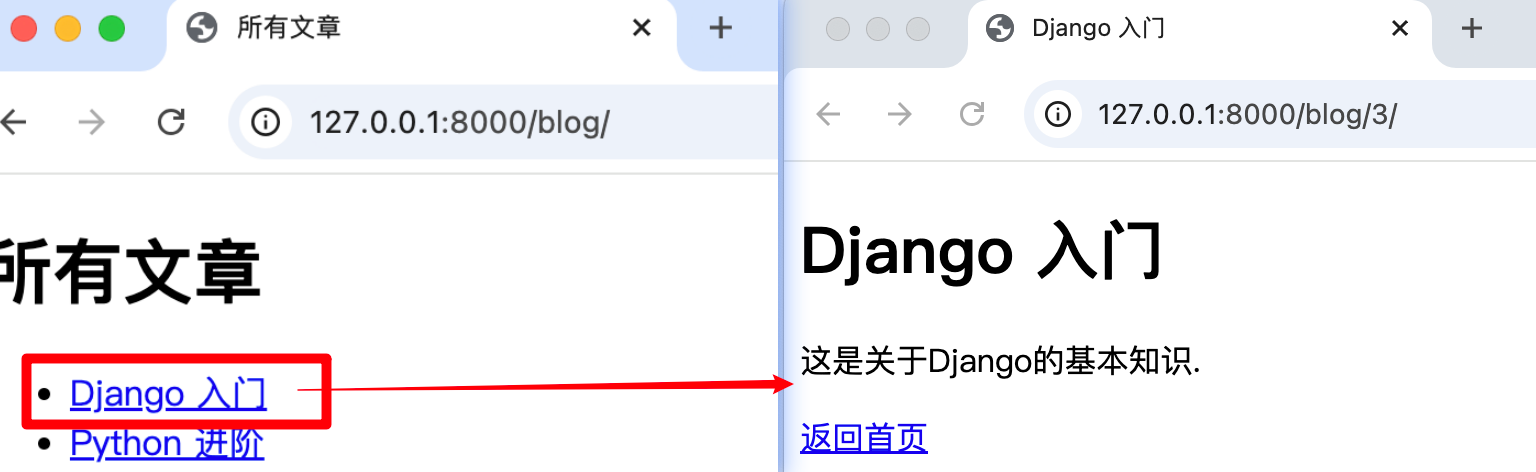
<a href="{% url 'post_detail' id=post.id %}">{{ post.title }}</a>
</li>
{% empty %}
<li>暂无文章</li>
{% endfor %}
</ul>
</body>
</html>完成这些之后,你访问 /blog/ 时看到的首页文章列表,每个标题就能点进去,跳转到对应文章的详情页了。
获取请求参数与body处理
URL 动态路径参数
什么是“动态路径参数”?
就是 URL 地址中直接嵌入一个“值”,比如:
/post/1/   表示访问 ID 为 1 的文章
/post/23/  表示访问 ID 为 23 的文章
Django 如何实现?
urls.py 这样写:
path('post/<int:id>/', views.post_detail, name='post_detail')<int:id> 表示这是一个整数类型的参数,叫做 id。
当用户访问 /post/3/ 时,Django 会自动把 3 提取出来,传给 views.post_detail 函数。
views.py 中处理:
from django.http import HttpResponse
from .models import Post # 假设你有这个模型
def post_detail(request, id):
post = Post.objects.get(id=id) # 根据 id 找文章
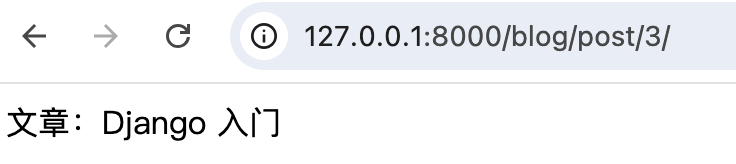
return HttpResponse(f"文章:{post.title}")访问测试:
你访问 /post/3/,它会去数据库里查 ID=3 的文章,并返回:
复杂的 URL 路由动态路径参数推荐使用关键字参数
URL 正则表达式配置
假设我们仍然在博客应用的上下文中,有一个能够处理动态路径参数 id 的文章详情页,使用 re_path()。我们将允许 id 参数为数字,且可以指定文章的 slug(短语)如: /post/1/python-introduction/。
首先,在 urls.py 中使用 re_path():
# blog/urls.py
from django.urls import re_path
from . import views

urlpatterns = [
    re_path(r'^post/(?P<id>\d+)/(?P<slug>[\w-]+)/$', views.post_detail, name='post_detail'),
](?P<id>\d+)是一个命名捕获组,它捕获数字,并将其存储为id。(?P<slug>[\w-]+)捕获一个包含字母、数字、下划线和连字符的字符串并将其存储为slug。
在 views.py 中定义如何处理这个视图:
# blog/views.py
from django.http import HttpResponse
from django.shortcuts import get_object_or_404
from .models import Post # 假设你有这个模型
def post_detail(request, id, slug):
# 使用 get_object_or_404 确保获取的文章存在
post = get_object_or_404(Post, id=id)
# 返回文章详情
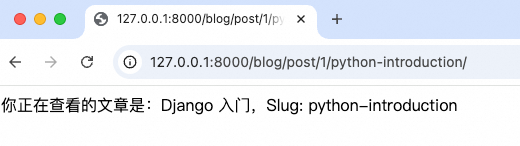
return HttpResponse(f"你正在查看的文章是:{post.title},Slug: {slug}")可以通过以下 URL 来访问文章详情:
/post/1/python-introduction//post/23/another-article/
获取 GET 请求参数(如 /search/?q=xxx)
什么是 GET 请求参数?
当你访问一个 URL,并带上参数,如:
/search/?q=django这叫 GET 请求参数,q=django 中:
q是参数名django是参数值
常用于搜索功能、筛选功能等。
单个键单个值 get 请求
代码讲解:
urls.py
path('search/', views.search, name='search')views.py
from django.http import HttpResponse
def search(request):
query = request.GET.get('q') # 从 URL 中取出参数 q 的值
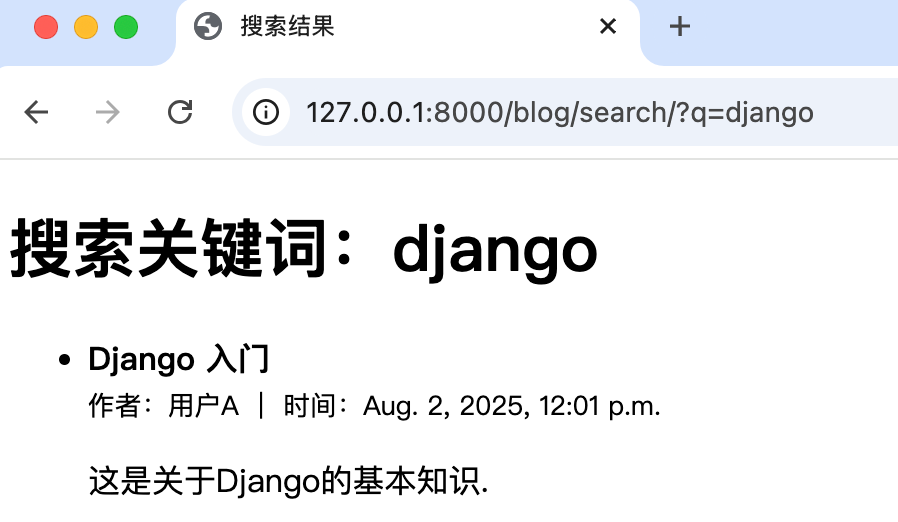
return HttpResponse(f"搜索关键词:{query}")访问 /search/?q=django 会返回 “搜索关键词:django”
继续完善和扩展:如果你希望能返回标题或内容中包含 “django” 的所有文章(Post)。
修改 views.py 中的 search 视图
# blog/views.py
from django.shortcuts import render
from .models import Post

def search(request):
    query = request.GET.get('q')  # 从 URL 中获取查询参数
    if query:
        # 使用 Django ORM 进行模糊查询
        posts = Post.objects.filter(title__icontains=query) | Post.objects.filter(content__icontains=query)
    else:
        # 如果没有搜索关键词,返回空结果或所有文章
        posts = Post.objects.none()  # 返回一个空的 QuerySet

    return render(request, 'blog/search_results.html', {'query': query, 'posts': posts})
这里的关键点是使用 icontains 来实现不区分大小写的模糊查询,返回标题或内容中包含指定关键词的所有文章。
添加一个模板 search_results.html
文件路径:templates/blog/search_results.html
<!DOCTYPE html>
<html>
<head>
  <title>搜索结果</title>
</head>
<body>
  <h1>搜索关键词:{{ query }}</h1>

  {% if posts %}
    <ul>
      {% for post in posts %}
        <li>
          <strong>{{ post.title }}</strong><br>
          <small>作者:{{ post.author.name }} | 时间:{{ post.created_at }}</small><br>
          <p>{{ post.content }}</p>
        </li>
      {% endfor %}
    </ul>
  {% else %}
    <p>没有找到相关的文章。</p>
  {% endif %}
</body>
</html>
页面会显示标题或内容中包含 “django” 的所有文章,如:
多个键值对
如果您需要处理多个查询参数,可以使用 request.GET 来提取多个参数的值。这是一个类字典对象,允许您访问 URL 中的所有查询参数。您可以通过参数名称来访问相应的参数值,并且可以提供默认值以处理参数可能不存在的情况。
以下是一个示例代码:
# urls.py
from django.urls import path
from . import views

urlpatterns = [
    path('search/', views.search, name='search')
]

# views.py
from django.http import HttpResponse

def search(request):
    # 从 URL 中获取多个参数的值
    keyword = request.GET.get('q', '')  # 当参数不存在时,默认值为空字符串
    category = request.GET.get('category', 'all')  # 当参数不存在时,默认值为 'all'
    date = request.GET.get('date', None)  # 当参数不存在时,默认值为 None

    response_text = f"搜索关键词:{keyword}, 类别:{category}, 日期:{date}"
return HttpResponse(response_text)在这个例子中,我们查询三个参数:q、category 和 date。URL 访问示例:
/search/?q=django&category=books&date=2023-01-01会返回 “搜索关键词:django, 类别:books, 日期:2023-01-01”/search/?q=django&category=books会返回 “搜索关键词:django, 类别:books, 日期:None”/search/?category=books会返回 “搜索关键词:, 类别:books, 日期:None”
单个键多个值 request.GET.getlist()
假设您正在处理一个允许用户选择多个类别进行搜索的场景,这里是一个使用 request.GET.getlist() 的例子
例如,您有一个搜索接口,用户可以通过多个类别进行搜索,使用 URL 参数的形式如下:/search/?category=books&category=music&category=movies:
# urls.py
from django.urls import path
from . import views

urlpatterns = [
    path('search/', views.search, name='search'),
]

# views.py
from django.http import HttpResponse

def search(request):
    # 使用 getlist() 获取所有 category 参数的值列表
    categories = request.GET.getlist('category')

    # 将类别列表转换为一个字符串,以便在响应中显示
    categories_str = ", ".join(categories)

    response_text = f"选择的类别:{categories_str}"
return HttpResponse(response_text)在这个例子中,request.GET.getlist('category') 将返回 ['books', 'music', 'movies']。然后,我们将这些值合并成一个字符串并返回给客户端。

请求体body中发送数据(表单数据、json、xml)
获取 POST 表单参数
什么是 POST 表单提交?
POST 请求通常用于向服务器提交数据(比如用户发评论、注册、登录等)。
HTML 中写 <form method="post">,就代表是 POST 请求。
路由配置:urls.py
这是 URL 路由系统的入口,你必须定义“表单页面”和“处理提交”的地址:
from django.urls import path
from . import views

urlpatterns = [
    path('comment/', views.comment_page, name='comment_page'),  # 用户访问这个页面填写评论
    path('submit_comment/', views.comment_post, name='comment_post'),  # 提交表单数据处理
]前端页面:templates/blog/comment.html
必须创建一个 HTML 页面,里面包含 <form> 表单。
<!-- templates/blog/comment.html -->
<!DOCTYPE html>
<html>
<head>
  <title>发表评论</title>
</head>
<body>
  <h1>评论文章</h1>

  <!-- 表单区域 -->
  <form method="post" action="{% url 'comment_post' %}">
    {% csrf_token %}  <!-- 防止跨站攻击,必须有 -->
    <textarea name="content" placeholder="写下你的评论..." rows="5" cols="40"></textarea>
    <br>
    <button type="submit">提交评论</button>
  </form>
</body>
</html>| 表单字段 | 含义 |
|---|---|
method="post" | 表示使用 POST 请求提交数据 |
action="{% url 'comment_post' %}" | 提交数据到后端处理路径(匹配上面第二个路由) |
name="content" | 表示评论内容字段,后端要用这个名字提取值 |
{% csrf_token %} | Django 安全机制要求表单必须带上这个字段 |
后端视图函数处理表单提交:views.py
from django.http import HttpResponse
from django.shortcuts import render
from django.views.decorators.csrf import csrf_exempt # 如果你没用 {% csrf_token %},可临时关闭 CSRF
def comment_page(request):
return render(request, 'blog/comment.html')
@csrf_exempt # 如果你没有 {% csrf_token %},临时加这个。生产环境不要加
def comment_post(request):
if request.method == "POST":
content = request.POST.get("content")
return HttpResponse(f"你提交的评论内容是:{content}")
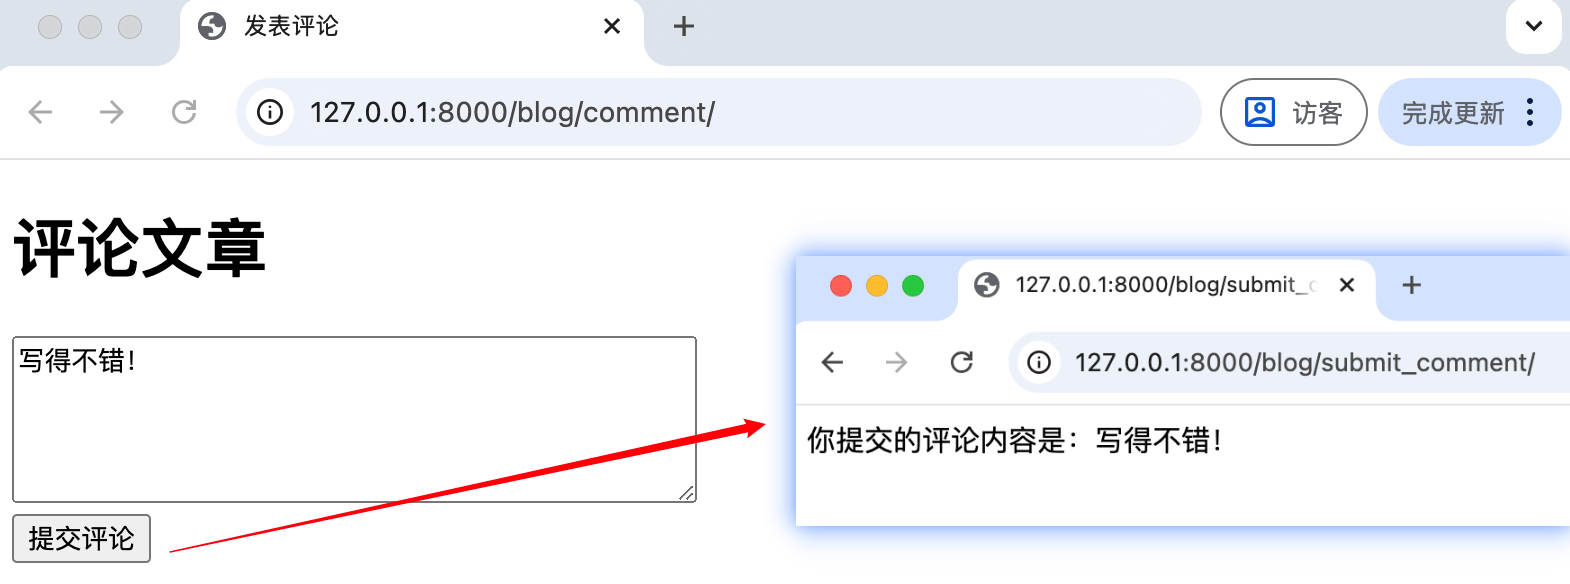
return HttpResponse("请通过 POST 提交")完整流程演示:
| 步骤 | 说明 |
|---|---|
用户访问 /comment/ | 会触发 views.comment_page,渲染并显示 comment.html 表单页面 |
| 用户填写评论并点击“提交”按钮 | 浏览器向 /submit_comment/ 发出一个 POST 请求 |
后端的 comment_post() 处理函数会被调用 | 从 request.POST.get('content') 中获取表单字段值,进行处理或保存 |
难点:请问用户填写评论并点击“提交”按钮后,为什么会触发浏览器向 /submit_comment/ 发出一个 POST 请求?
用户填写评论并点击“提交”按钮后,浏览器会向 /submit_comment/ 发送 POST 请求的原因是由于 HTML <form> 元素的配置。以下是 HTML <form> 的关键属性,以及它们如何影响数据提交:
method="post":- 这意味着表单数据将使用 HTTP POST 方法提交。POST 请求被用于向服务器发送数据以创建或更新资源。
action="{% url 'comment_post' %}":- 这个属性定义了表单数据提交的目标 URL。在这个例子中,
{% url 'comment_post' %}是 Django 模板标签,它将被解析为 URL 路由系统中名称为'comment_post'的路径。因此,这会生成/submit_comment/路径(通过 name=’comment_post’ 方向解析出路径),依据您在urls.py中定义的路由。 - 因此,当用户点击提交按钮时,请求会被发送到
/submit_comment/。
- 这个属性定义了表单数据提交的目标 URL。在这个例子中,
整个步骤过程:
- 用户请求表单页面:
- 请求: 用户在浏览器中访问 URL
/comment/。 - 处理: Django 路由将该请求对应到
views.comment_page。 - 响应:
comment_page函数通过render将templates/blog/comment.html页面返回给客户端。 - 展示: 浏览器渲染并显示 HTML 表单页面给用户。
- 请求: 用户在浏览器中访问 URL
- 用户填写表单并提交:
- 操作: 用户在浏览器中填写评论内容,并点击提交按钮。
- 网络请求: 浏览器根据
<form>元素的method和action属性,向/submit_comment/发出一个 POST 请求。
- 服务器处理提交的表单数据:
- 请求收集: POST 请求由 Django 框架处理,并通过 URL 路由系统对应到
views.comment_post。 - 数据处理:
comment_post函数检查请求方法为 POST,提取数据request.POST.get('content')。 - 响应生成: 将提取的评论内容生成响应,并以
HttpResponse返回给客户端。
- 请求收集: POST 请求由 Django 框架处理,并通过 URL 路由系统对应到
- 响应到客户端:
- 用户可见: 浏览器接收来自服务器的响应,并呈现给用户(例如显示“你提交的评论内容是:…”)。
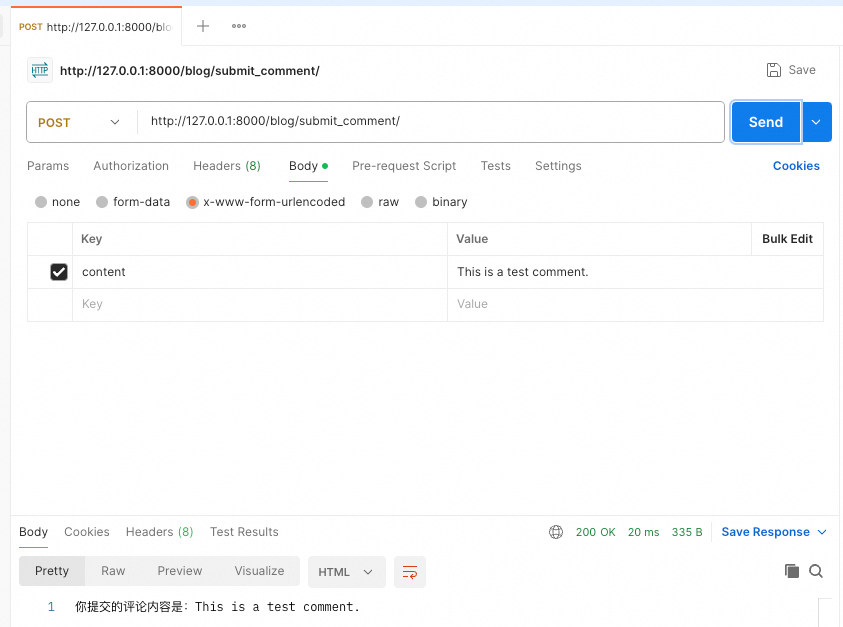
可以用postman 测试过程
- 请求设置:
- 打开 Postman,选择 HTTP 请求类型为
POST。 - 设置请求 URL 为
http://your-server-domain/submit_comment/(替换your-server-domain为实际服务器地址或localhost)。
- 打开 Postman,选择 HTTP 请求类型为
- 设置请求 Body:
- 在
Body标签中,选择x-www-form-urlencoded。 - 添加一个键值对:
- Key:
content - Value: 输入您想测试的评论内容,例如
This is a test comment.
- Key:
- 在
- 发送请求:
- 点击
Send发送请求。
- 点击
- 查看响应:
POST 方式传递和解析 json 数据
传递和解析 JSON 数据在现代 web 应用中非常普遍,尤其是在使用 JavaScript 和后端 API 通信时。以下是基础概念和一个简单的例子。
JSON 数据介绍
- JSON (JavaScript Object Notation) 是一种轻量级的数据交换格式,易于人和机器读取和写入。
- 它基于键值对结构,类似于 Python 的字典或 JavaScript 的对象。
- JSON 数据类型包括字符串、数字、布尔值、数组和对象。
传递 JSON 数据
可以通过 HTTP POST 请求发送 JSON 格式的数据。通常这会在应用程序的前端和后端之间进行。
案例:传递和解析 JSON 数据
假设有一个 Django 后端应用,需要处理用户的个人信息,该信息以 JSON 格式传递。
修改 urls.py
# urls.py
from django.urls import path
from . import views

urlpatterns = [
    path('user_info/', views.user_info, name='user_info'),  # 配置路由以处理用户信息请求
]
后端视图处理 JSON 数据 (views.py)
from django.http import JsonResponse
from django.views.decorators.csrf import csrf_exempt
import json

@csrf_exempt  # 再生产环境应启用 CSRF 防护机制,目前为了便于测试禁用
def user_info(request):
    if request.method == "POST":
        try:
            # 从请求体中解析 JSON 数据
            data = json.loads(request.body) # json 形式的字符串不太好操作,一般都会通过 json.loads转化成字符串
            name = data.get('name')
            age = data.get('age')
            # 可以对数据进行处理或存储

            return JsonResponse({'message': f'Hello, {name}, your age is {age}.'})
        except json.JSONDecodeError:
            return JsonResponse({'error': 'Invalid JSON'}, status=400)

    return JsonResponse({'error': 'Only POST method allowed'}, status=405)
可以使用 Postman 或任何其他 HTTP 客户端工具进行测试:
- 请求设置:
- 打开 Postman,选择请求类型为
POST。 - 设置请求 URL 为
http://your-server-domain/user_info/。
- 打开 Postman,选择请求类型为
- 设置请求 Header:
- 确保
Content-Type设置为application/json。
- 确保
- 设置请求 Body:
- 在
Body标签中,选择raw。 - 输入 JSON 数据,例如:
- 在
{
  "name": "John Doe",
  "age": 30
}- 发送请求:
- 点击
Send发送请求。
- 点击
- 查看响应:
- 服务器应该返回一条消息,确认已成功接收到并处理了 JSON 数据。

json.dumps 和 json.load
json.dumps 用于将 Python 对象(如字典或列表)序列化为 JSON 格式的字符串。这个过程称为“序列化”。序列化的主要用途是在数据在网络传输或存储到文件时,将数据转换为一种标准格式。
用法示例:
import json

data = {
    "name": "John Doe",
    "age": 30,
    "active": True,
    "roles": ["admin", "user"]
}

# 将 Python 对象序列化为 JSON 字符串
json_string = json.dumps(data)
print(json_string)在这个示例中,json.dumps(data) 将 Python 字典转换为 JSON 字符串,并将结果打印出来。
json.load 用于从文件对象中读取 JSON 数据,并将其解析为 Python 对象。这与 json.loads 有所不同,因为 json.loads 解析的是字符串,而 json.load 解析的是文件。
假设我们有一个文件 data.json,其内容如下:
{
  "name": "Jane Doe",
  "age": 25,
  "active": false,
  "roles": ["editor", "user"]
}
我们用 json.load 读取这个文件:
import json

# 打开 JSON 文件进行读取
with open('data.json', 'r') as file:
    # 使用 json.load 解析文件中的 JSON 数据
    data = json.load(file)

print(data)在这个示例中,json.load(file) 从文件中读取 JSON 数据并解析为 Python 字典,然后将结果打印出来。
请求头获取
在处理 HTTP 请求时,请求头(HTTP Headers)是非常重要的部分。请求头携带了关于客户端环境、请求细节、传输数据等多种信息,这些信息用于告知服务器如何处理请求。理解和使用请求头是开发 Web 应用时的基本技能之一。
- Content-Type:
- 描述请求体的媒体类型。例如,
application/json表示请求体是 JSON 数据,application/x-www-form-urlencoded表示表单数据。 - 服务器通过这个头来决定如何解析请求体内容。
- 描述请求体的媒体类型。例如,
- Accept:
- 指定客户端能够处理的内容类型。这意味着客户端期望从服务器接收的数据类型,比如
text/html或application/json。 - 服务器根据 Accept 头选择合适的 MIME 类型进行响应。
- 指定客户端能够处理的内容类型。这意味着客户端期望从服务器接收的数据类型,比如
- Authorization:
- 包含用于验证客户端身份的凭据信息。它常用于实施认证机制,如 Basic Auth、Bearer Token 等。
- 安全性关键,用于保护 API,确保只有授权用户才能访问。
- User-Agent:
- 提供有关发起请求的客户端的详细信息,通常是浏览器名称和版本。
- 服务器可以使用 User-Agent 头来定制响应内容,比如为不同浏览器优化显示。
- Accept-Language:
- 指定客户端能够理解的语言种类,例如
en-US表示美国英语。 - 服务器可以基于这个信息提供多语言支持。
- 指定客户端能够理解的语言种类,例如
- Referer:
- 包含表示请求来源的 URL,指示用户从哪个页面链接到当前请求的资源。
- 较常用于分析流量源或防止 CSRF 攻击。
- Cookie:
- 包含与请求关联的 cookie 数据,通常包括会话信息。
- 服务器可以利用 cookie 头来跟踪会话状态。
- Cache-Control:
- 指示客户端的缓存机制相关指令,控制如何缓存请求和响应数据。
- 服务器可以根据 Cache-Control 头调整对客户端的缓存策略。
在 Django 或其他 Web 框架中,处理请求头非常方便。通常可以通过 request.headers 访问请求头。例如,在 Django 中:
def my_view(request):
    content_type = request.headers.get('Content-Type', '')
    user_agent = request.headers.get('User-Agent', '')

    # Do something with the request headers
    print(f'Content-Type: {content_type}')
    print(f'User-Agent: {user_agent}')
常用的 httprequest 对象属性
常用的 HttpRequest 属性
GET:- 包含查询字符串参数,是一个
QueryDict对象。 - 使用示例:
request.GET['param_name']
- 包含查询字符串参数,是一个
POST:- 包含请求主体中的表单数据,也是一个
QueryDict。 - 使用示例:
request.POST['param_name']
- 包含请求主体中的表单数据,也是一个
FILES:- 包含上传的文件信息,是一个
MultiValueDict。 - 使用示例:
request.FILES['file_field_name']
- 包含上传的文件信息,是一个
COOKIES:- 一个字典,包含请求中发送的所有 cookies。
- 使用示例:
request.COOKIES['cookie_name']
HTTP 响应返回
常用的响应类总结
| 类名 | 说明 | 用途示例 |
|---|---|---|
HttpResponse | 返回纯文本或 HTML | 返回普通字符串、HTML、状态码 |
render | 返回渲染后的模板页面 | 常用于展示网页 |
redirect | 重定向到新地址 | 登录后跳转,提交表单后跳转等 |
JsonResponse | 返回 JSON 数据 | 前后端交互、AJAX 请求 |
HttpResponseNotFound | 返回 404 响应 | 页面不存在时使用 |
HttpResponseRedirect | 和 redirect() 类似,直接构造跳转响应 |
假设你的 app 叫做 blog,我们现在要在 blog/views.py 和 blog/urls.py 中写代码。
一、HttpResponse():返回纯文本或 HTML
views.py
from django.http import HttpResponse
def hello(request):
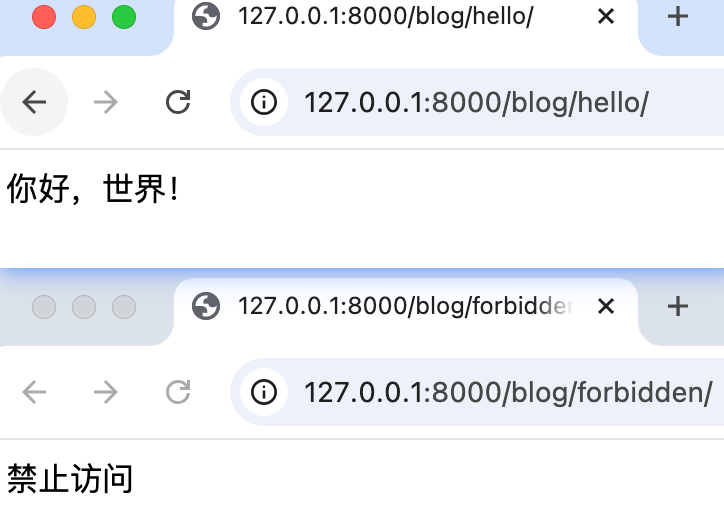
return HttpResponse("你好,世界!")
def forbidden(request):
return HttpResponse("禁止访问", status=403)urls.py
from django.urls import path
from . import views

urlpatterns = [
    path('hello/', views.hello, name='hello'),
    path('forbidden/', views.forbidden, name='forbidden'),
]
访问 /hello/ → 显示文本「你好,世界!」
访问 /forbidden/ → 显示文本「禁止访问」,状态码 403
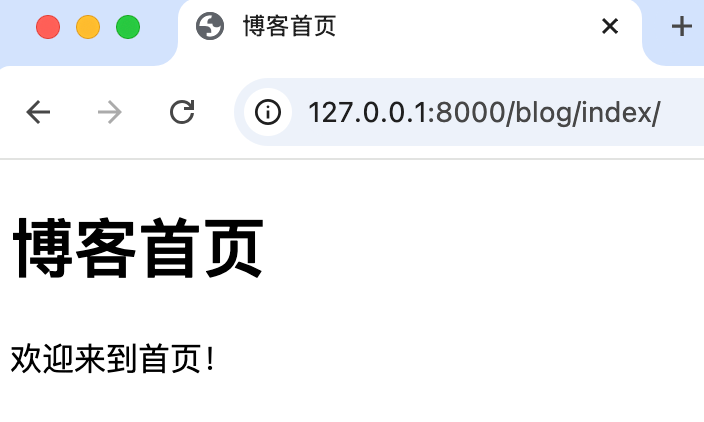
二、render():返回 HTML 模板页面
views.py
from django.shortcuts import render

def index(request):
    return render(request, 'blog/index.html', {"title": "博客首页"})
urls.py
path('index/', views.index, name='index'),templates/blog/index.html 示例模板:
<!DOCTYPE html>
<html>
<head>
  <title>{{ title }}</title>
</head>
<body>
  <h1>{{ title }}</h1>
  <p>欢迎来到首页!</p>
</body>
</html>
访问 /index/ → 渲染 HTML 模板页面
三、redirect():页面跳转
views.py
from django.shortcuts import redirect

def login_success(request):
    return redirect('/hello/')  # 直接跳转到另一个路径

def redirect_named(request):
    return redirect('index')  # 跳转到命名路由
urls.py
path('login_success/', views.login_success, name='login_success'),
path('redirect_named/', views.redirect_named, name='redirect_named'),
访问 /login_success/ → 会跳转到 /hello/
访问 /redirect_named/ → 会跳转到 /index/
四、JsonResponse():返回 JSON 数据
views.py
from django.http import JsonResponse

def api_data(request):
    data = {"name": "Django", "type": "framework"}
    return JsonResponse(data)
urls.py
path('api/data/', views.api_data, name='api_data'),访问 /api/data/ → 返回 JSON:
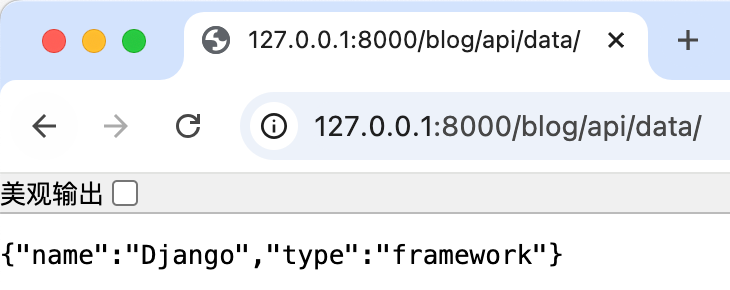
五、FileResponse:下载文件
你可以先在项目根目录下放一个 PDF 文件,比如:example.pdf
views.py
from django.http import FileResponse
import os

def download_file(request):
    filepath = os.path.join(os.path.dirname(__file__), 'example.pdf')
    return FileResponse(open(filepath, 'rb'), as_attachment=True, filename='example.pdf')
urls.py
path('download/', views.download_file, name='download_file'),访问 /download/ → 下载 example.pdf 文件
实际开发中如何选择响应方式?
| 场景 | 推荐用法 |
|---|---|
| 返回一个 HTML 页面 | render() |
| 提交表单成功后跳转 | redirect() |
| AJAX/FetchAPI 请求获取数据 | JsonResponse() |
| 非页面的错误提示 | HttpResponse("错误信息", status=403) |
错误页面处理方式
主动返回:
from django.http import HttpResponseNotFound

def my_view(request):
    return HttpResponseNotFound("页面不存在")
使用 get_object_or_404:
from django.shortcuts import get_object_or_404

post = get_object_or_404(Post, id=3)
根据模型和条件尝试从数据库中获取一条数据,如果找不到,就自动返回 404 页面(而不是抛出异常)
get_object_or_404(模型类, **查询条件)
- 模型类:你要查询的模型(比如
Post) - 查询条件:用字段名=值的形式,比如
id=3 - 如果能查到,就返回那条记录
- 如果查不到,就返回
Http404错误,自动显示 “页面未找到”
这种方式的好处:如果使用post = Post.objects.get(id=3),如果 id=3 的文章存在,一切正常
,如果不存在,会抛出异常 Post.DoesNotExist,程序就会崩溃。而使用post = get_object_or_404(Post, id=3),程序更健壮,不需要自己写 try-except,并且可以自动处理错误页(返回 404)
发布者:LJH,转发请注明出处:https://www.ljh.cool/43491.html