


简介
Nginx支持类似Squid的缓存功能
把URL以及相关信息当成key,用MD5编码哈希后,把数据文件保存在硬盘上。只能为指定的URL或者状态码设置过期时间,并不支持类似squid的purge命令来手动清除指定缓存页面。
可通过第三方的ngx_cache_purge来清除指定的URL缓存。
Nginx的缓存加速功能是由proxy_cache和fastcgi_cache两个功能模块完成的。
Nginx缓存加速特点
缓存功能也十分稳定,运行速度不逊于squid,对多核CPU的利用率比其他的开源软件也要好,支持高并发请求数,能同时承受更多的访问请求。
Nginx缓存实验
服务器准备:
nginx:192.168.1.10
web:192.168.1.11
下载缓存所需要的包
wget http://labs.frickle.com/files/ngx_cache_purge-2.3.tar.gz
nginx-1.6自行下载
安装
useradd -M -s /sbin/nologin nginx
yum -y install pcre-devel zlib-devel
tar xf ngx_cache_purge-2.3.tar.gz -C /usr/src/
tar xf nginx-1.6.0.tar.gz -C /usr/src/
cd /usr/src/nginx-1.6.0/
./configure –prefix=/usr/local/nginx –user=nginx –group=nginx –with-http_stub_status_module –with-pcre –add-module=/usr/src/ngx_cache_purge-2.3/ && make && make install
/usr/local/nginx/sbin/nginx -V 查看模块是否加载

ln -s /usr/local/nginx/sbin/nginx /usr/local/sbin/
cd /usr/local/nginx/
配置文件
vim /usr/local/nginx/conf/nginx.conf
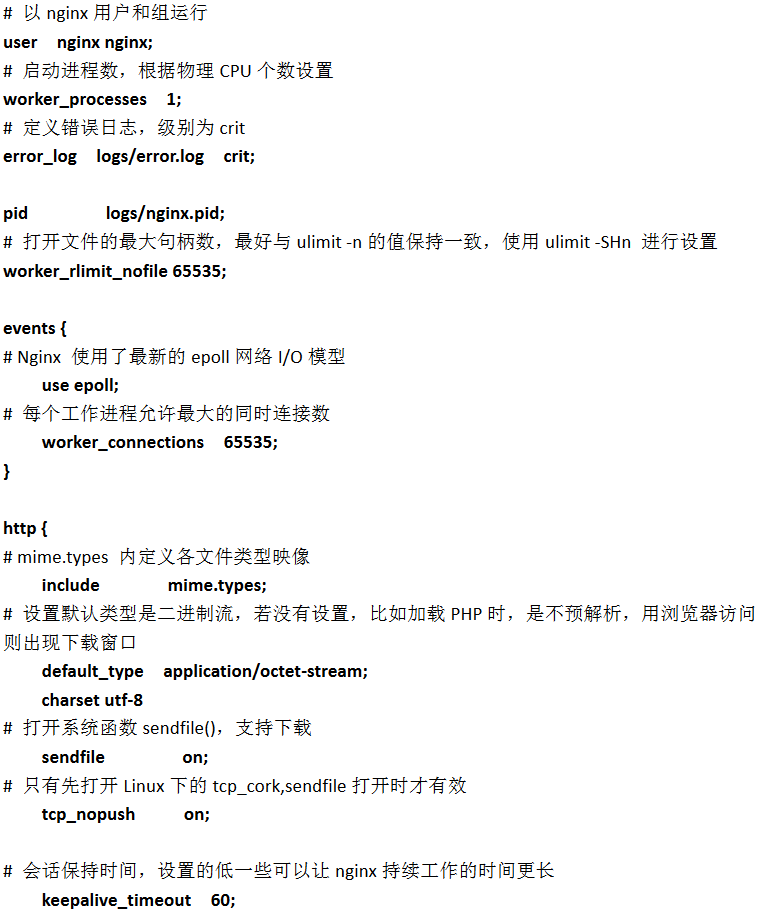
user nginx nginx;
worker_processes 1;
error_log logs/error.log crit;
#error_log logs/error.log notice;
#error_log logs/error.log info;
pid logs/nginx.pid;
worker_rlimit_nofile 65535;
events {
use epoll;
worker_connections 65535;
}
http {
include mime.types;
default_type application/octet-stream;
charset utf-8;
#log_format main '$remote_addr - $remote_user [$time_local] "$request" '
# '$status $body_bytes_sent "$http_referer" '
# '"$http_user_agent" "$http_x_forwarded_for"';
#access_log logs/access.log main;
sendfile on;
tcp_nopush on;
#keepalive_timeout 0;
keepalive_timeout 65;
#gzip on;
tcp_nodelay on;
client_body_buffer_size 512k;
proxy_connect_timeout 5;
proxy_read_timeout 60;
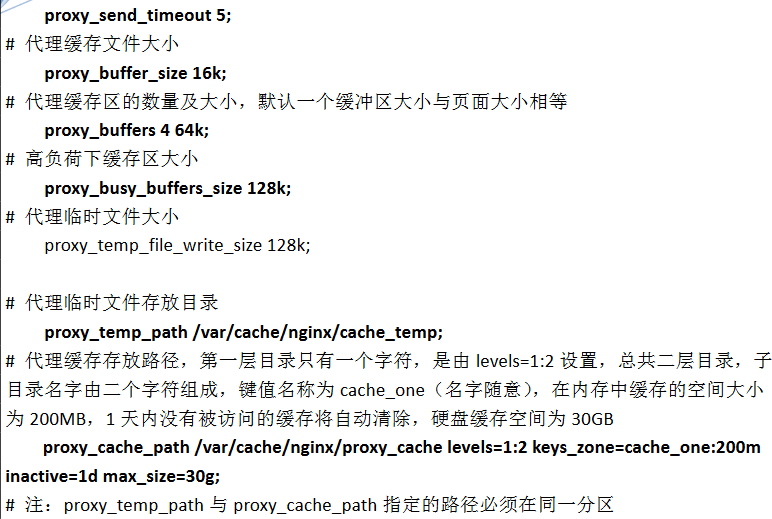
proxy_send_timeout 5;
proxy_buffer_size 16k;
proxy_buffers 4 64k;
proxy_busy_buffers_size 128k;
proxy_temp_file_write_size 128k;
proxy_temp_path /var/cache/nginx/cache_temp;
proxy_cache_path /var/cache/nginx/proxy_cache levels=1:2 keys_zone=cache_one:200m inactive=1d max_size=30g;
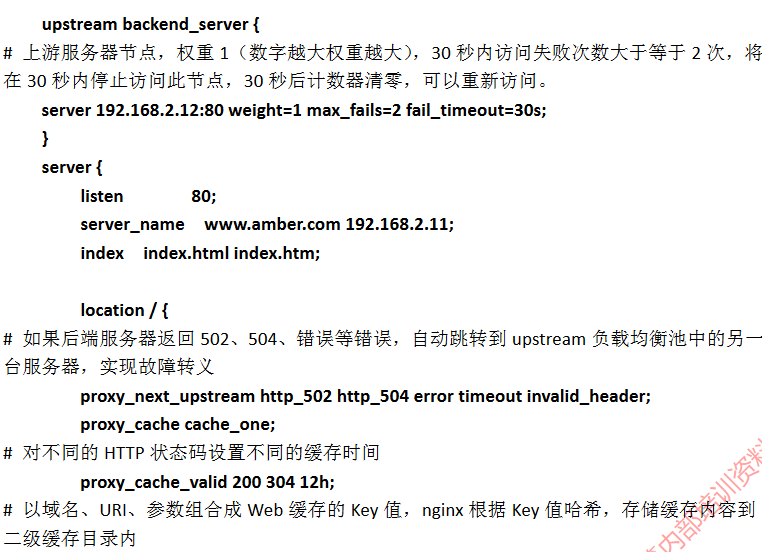
upstream backend_server {
server 192.168.1.11:80 weight=1 max_fails=2 fail_timeout=30s;
}
server {
listen 80;
server_name www.amber.com 192.168.1.10;
index index.html index.htm;
location / {
proxy_next_upstream http_502 http_504 error timeout invalid_header;
proxy_cache cache_one;
proxy_cache_valid 200 304 12h;
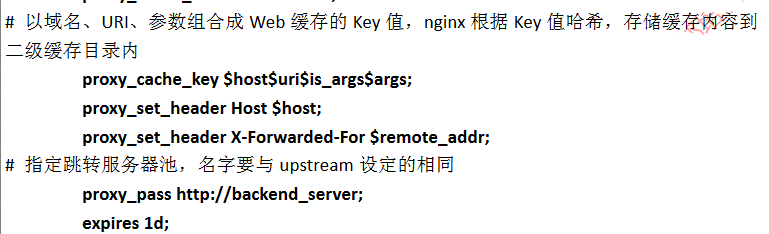
proxy_cache_key $host$uri$is_args$args;
proxy_set_header Host $host;
proxy_set_header X-Forwarded-For $remote_addr;
proxy_pass http://backend_server;
expires 1d;
}
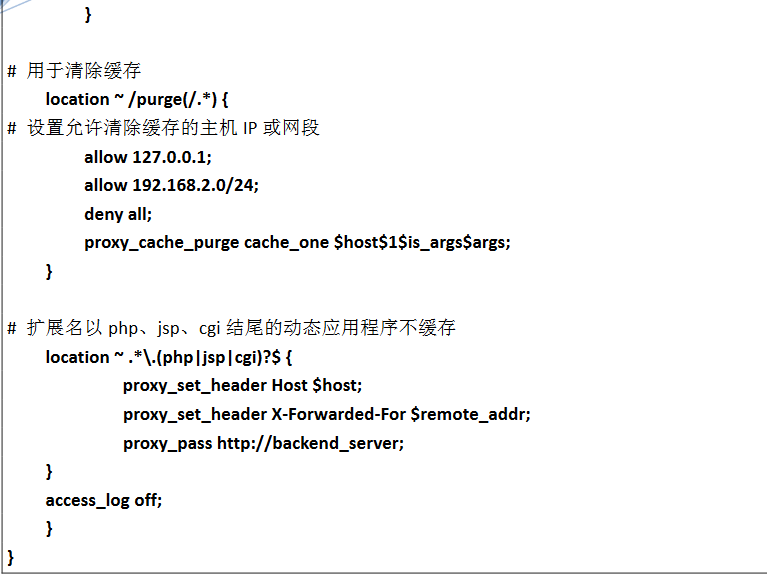
location ~ /purge(/.*) {
allow 127.0.0.1;
allow 192.168.1.0/24;
deny all;
proxy_cache_purge cache_one $host$1$is_args$args;
}
location ~ .*.(php|jsp|cgi)?$ {
proxy_set_header Host $host;
proxy_set_header X-Forwarded-For $remote_addr;
proxy_pass http://backend_server;
}
access_log off;
}
}详解:
创建缓存目录:
mkdir /var/cache/nginx
ulimit -SHn 65535
nginx -t
ll /var/cache/nginx/
测试:
nginx
netstat -anpt |grep 80
安装Web服务器,建立测试页
yum -y install httpd
sed -n ‘276p’ /etc/httpd/conf/httpd.conf
systemctl start httpd
netstat -anpt |grep 80
查看缓存目录
ll /var/cache/nginx/proxy_cache/

浏览器输入192.168.1.10

ll /var/cache/nginx/proxy_cache/

ls /var/cache/nginx/proxy_cache/c/43

此目录存入了缓存文件
发布者:LJH,转发请注明出处:https://www.ljh.cool/6211.html